
Now a quick note on money figures. Prices on Shopify change several times a year, and every price on this page was checked on October 15, 2026. Check the linked Shopify page before you pay anything. We recheck these prices every month.
And one more note on wording. When I say "Shopify's rule," I mean a Shopify setting or policy, not a law. When I say "in my opinion," that's my own view.
Quick picks
What is Shopify, and what do you get for the monthly price?
So Shopify is software you rent each month to run an online store. Shopify calls it an all-in-one commerce platform. You build the store, take payments and manage orders from one control panel, and you don't need to write code.
Basically, the monthly price covers pieces that would otherwise be separate. Shopify's pricing page lists hosting, a free SSL certificate (the padlock in a browser that shows a page is encrypted), and a free web address ending in myshopify.com on every store. Checked October 15, 2026.
Shopify's pricing page also says Shopify stores are PCI compliant by default. PCI is the security standard for handling card numbers.
Now here's what Shopify isn't. Shopify is not a marketplace like Etsy, where shoppers already come to browse. In my opinion, that's the most important thing to understand before you start, because with Shopify you bring your own visitors. I compare the two in my Shopify vs Etsy guide.
What do you need before you sign up for Shopify?
So the list is shorter than most people expect, because Shopify only asks for the big items when you reach payments.
- An email address and a password. Those are the only two things Shopify asks for at signup.
- No LLC or EIN to start. An LLC is a type of company you register with your state. An EIN, or Employer Identification Number, is a tax ID number the IRS gives to businesses. My LLC and EIN guide has the IRS and Shopify pages behind that answer.
- No product ready. Shopify's help page says you can add a sample product while you first set up the store, so you can explore the screens before you decide what to sell.
- Later, for payments: your legal name, date of birth, Social Security number (or ITIN, an Individual Taxpayer Identification Number), a US phone number and your US home address. Shopify says banking regulations require these checks.
- Later, for payouts: a US checking account in dollars. Step 7 has the details.
And keep in mind that the order of Shopify's signup screens changes from time to time. The screens below come from September 2026, plus April and June 2026 where I say so.
Step 1: How do you create the Shopify account?
So the first step takes a few minutes, and nothing here costs money unless you choose to enter a card.
- Go to shopify.com/free-trial. Type your email address into the box and click the button to start. Shopify's help page calls it Start free trial.
- Create your password. The next screen says "Start your free trial" and shows the offer, 3 days free, then 3 months for $1 a month. Type a password, click Create account, and leave the country menu on United States if that's where you live. Small print under the box says you agree to Shopify's Terms, its Privacy Policy and marketing emails.
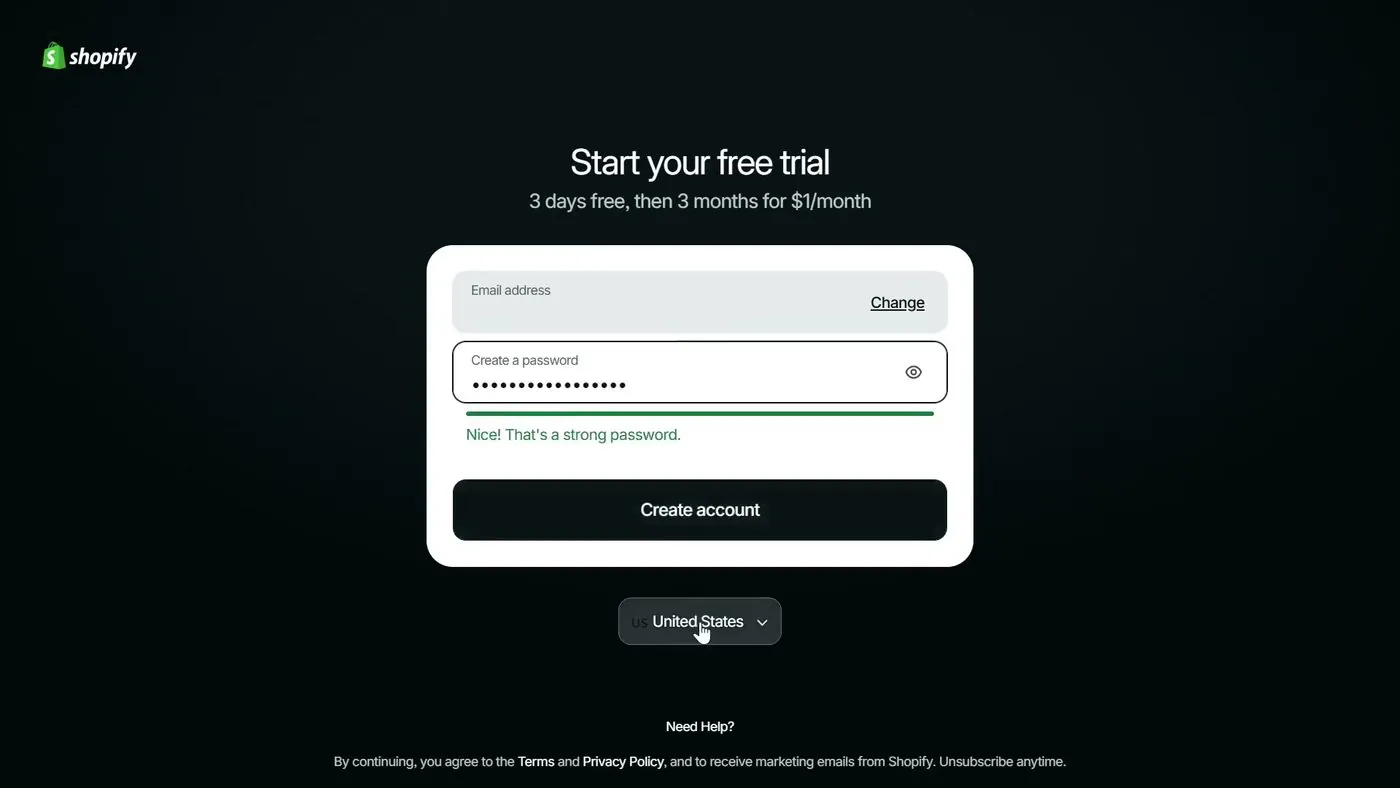
Shopify's account screen asks only for an email address and a password, September 2026, from Shopify Ecom Store Pro's video.
- Look at the card screen, then click Skip. Right after Create account, the next screen is titled "Start for free, stay for $1." The card screen has a yellow PayPal button. Below that are boxes for a card number, expiry date, security code and ZIP code. A Skip button sits in the top right corner.
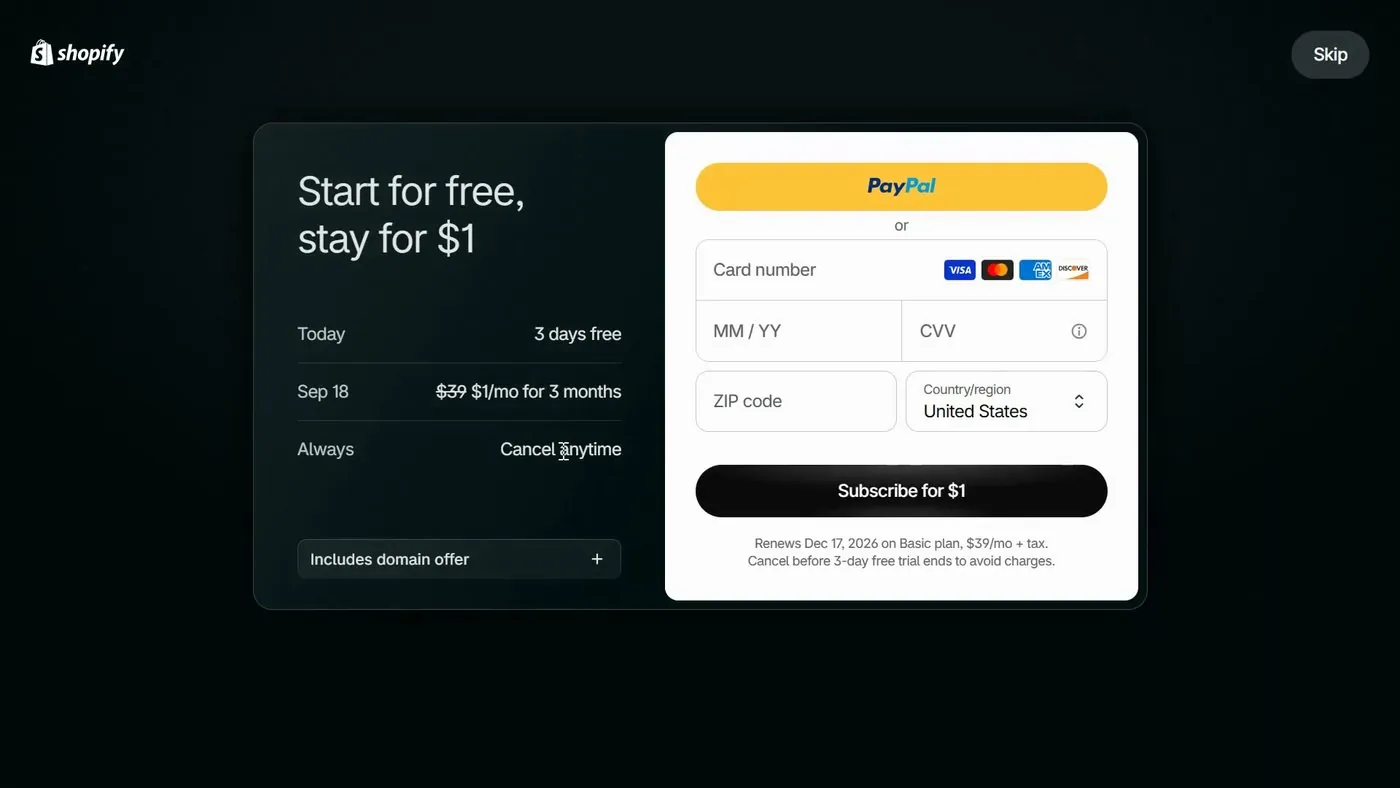
Shopify's card screen, with the Skip button in the top right corner, September 2026, from Shopify Ecom Store Pro's video.
So here's what the card screen says. The left side lists "Today: 3 days free," then the date the $1 months start, then "Always: Cancel anytime."
The small print under the black button says the account renews on the Basic plan at $39 a month plus tax. It also says to cancel before the 3-day trial ends to avoid charges.
In Shopify Ecom Store Pro's video, the trial ended on September 18 and the renewal date was December 17, 2026. Your own dates will be three days and three months after you sign up.
Skip lets you into the Shopify admin without picking a plan or entering a card. Shopify's pricing page says the trial needs no credit card, and the Skip button lets you keep going without one (checked October 15, 2026). My free trial and $1 offer guide covers the fine print and the cancel steps, so I won't repeat them here.
One thing to note is that Shopify's help page says the length of a free trial can vary. So read the number on your own signup screen. Checked October 15, 2026.
- Answer the setup questions, or skip them. In September, a screen asked "What can we help you do?" with choices like Sell online, Dropshipping and Sell digital products. In April, Shopify asked where you want to sell, whether the business is new or existing, and what you plan to sell. Then it asked what to call the store. A "Skip customized setup" link sat at the bottom. Shopify's help page says you can answer the questions or choose Skip All, so the skip button may have a slightly different name on your screen.
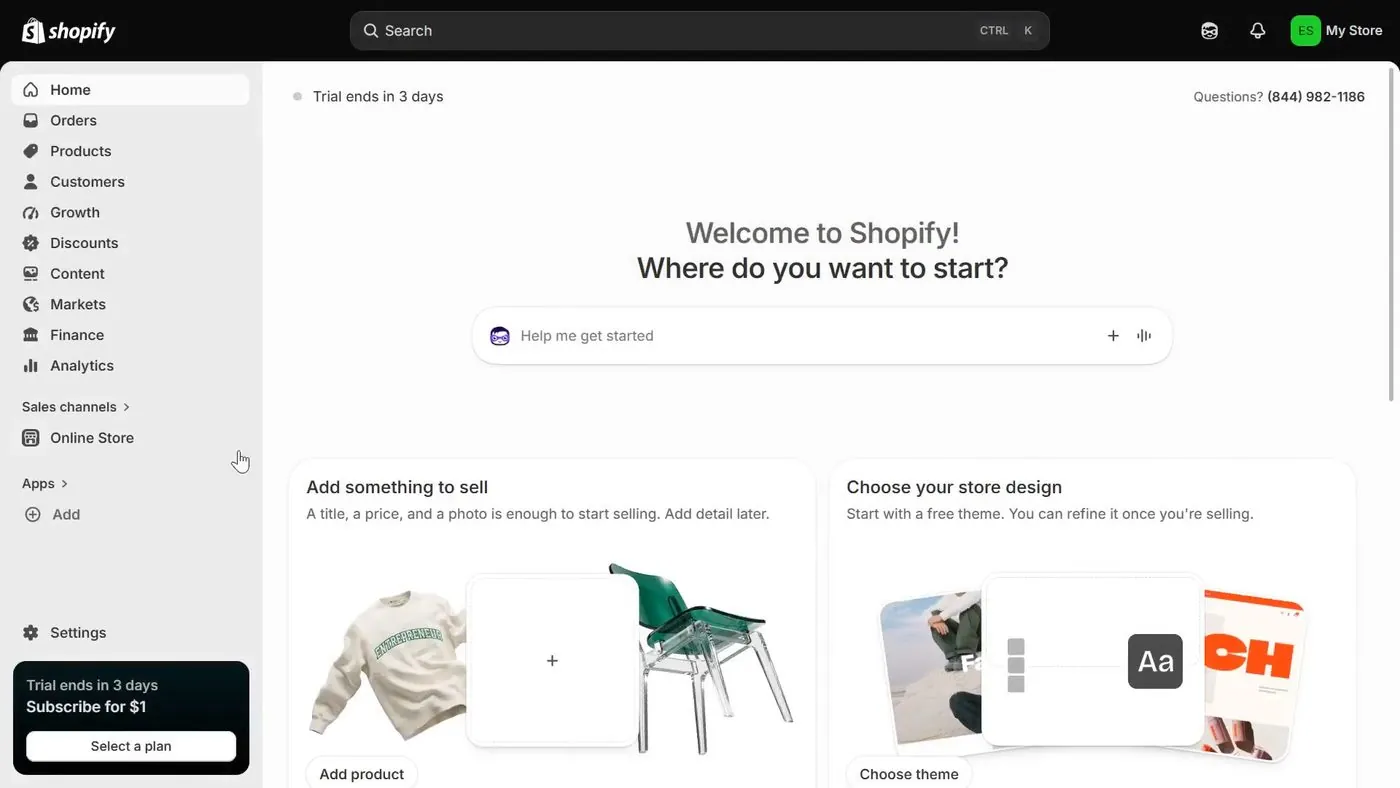
- Land in the Shopify admin. The admin is the control panel where you run the store. The Home page shows a box in the bottom left saying "Trial ends in 3 days" with a Select a plan button. Below that are setup cards: add something to sell, choose a store design, review payments, name your store, claim a web address and review shipping rates.
Everything from here on happens in the Shopify admin. The left menu has Home, Orders, Products, Customers, Content, Markets, Finance, Analytics, Online Store, Apps and Settings.
Step 2: Which plan should you pick, and what's the $29 versus $39 difference?
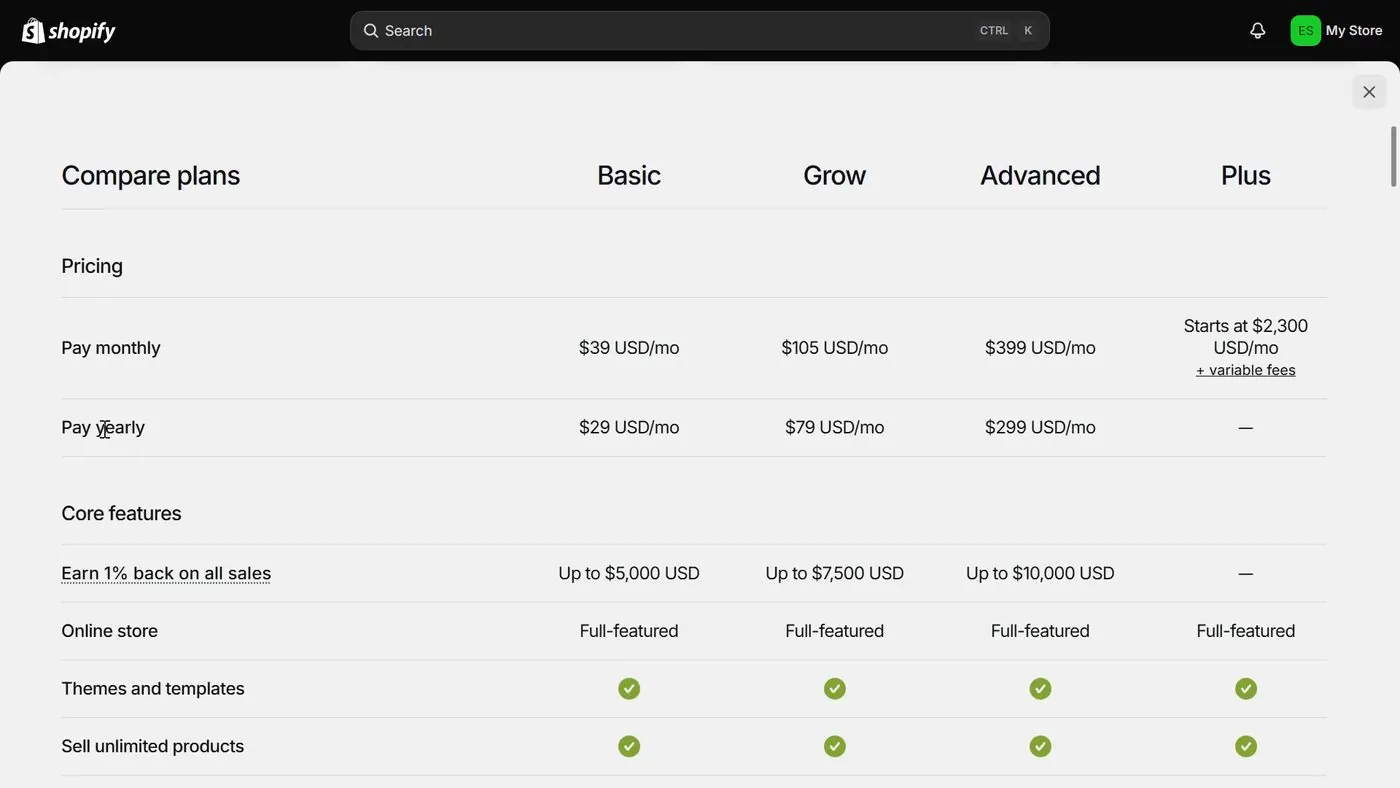
So the $29 and the $39 are the same plan, Shopify's Basic plan. The difference is how you pay. Basic costs $39 a month if you pay month to month. Basic costs $29 a month if you pay yearly, which means Shopify charges the full year at once. Both figures were checked on October 15, 2026, on Shopify's pricing page.
| How you pay | Basic plan, per month | What Shopify charges | Checked |
|---|---|---|---|
| Pay monthly | $39 | $39 each month, plus tax | Oct 15, 2026 |
| Pay yearly | $29 | $348 once for the year (12 x $29, my math, not a number Shopify prints) | Oct 15, 2026 |
Shopify's help page backs this up. Annual billing charges the full year upfront at a lower effective monthly rate, and month-to-month billing costs more per month. Checked October 15, 2026.
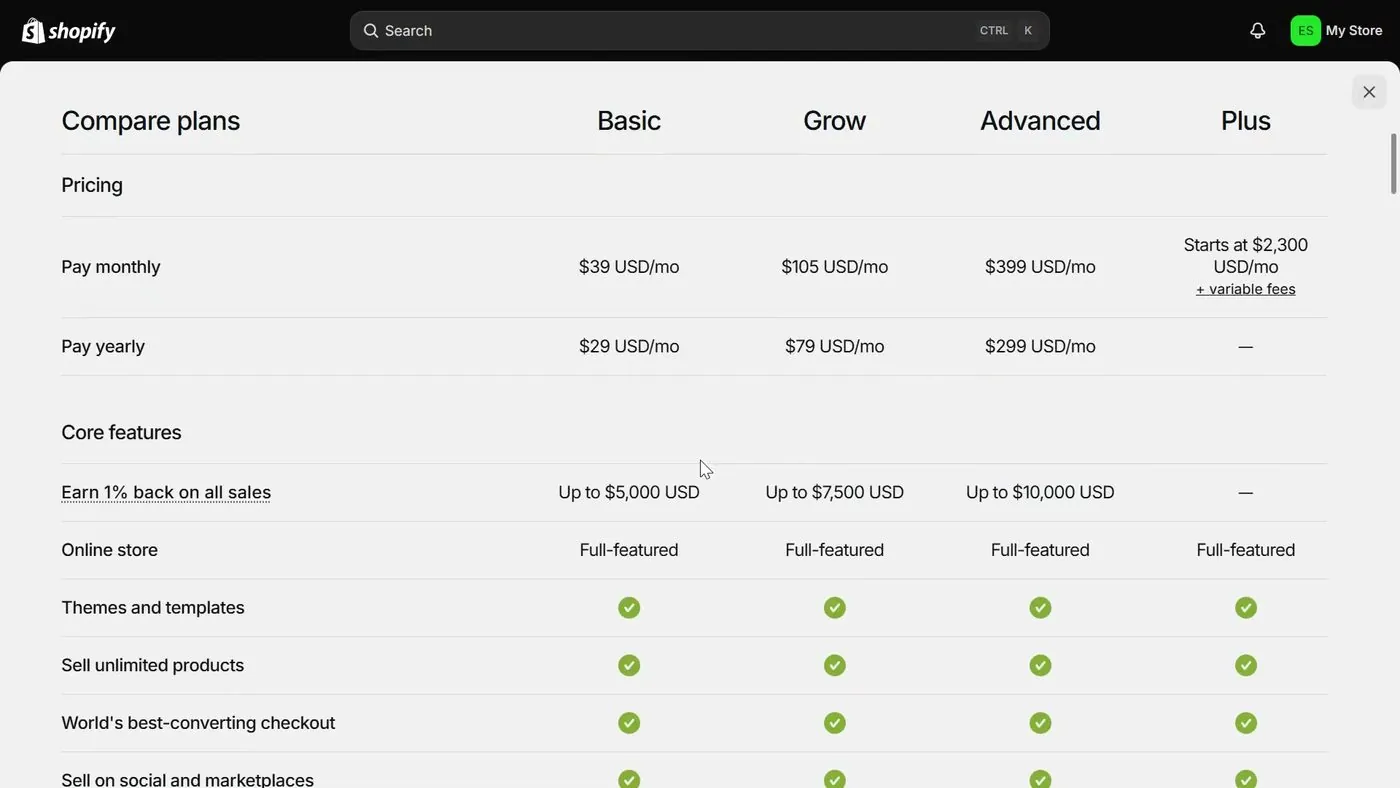
Shopify's Compare plans table shows Basic at $39 paid monthly and $29 paid yearly, September 2026, from Shopify Ecom Store Pro's video. This screen shows Grow at $79 and Advanced at $299 a month paid yearly. On October 15, 2026, Shopify's pricing page showed $89 and $359 in a normal browser. Shopify sometimes shows different visitors different prices for Grow and Advanced, so check Shopify's pricing page for yours.
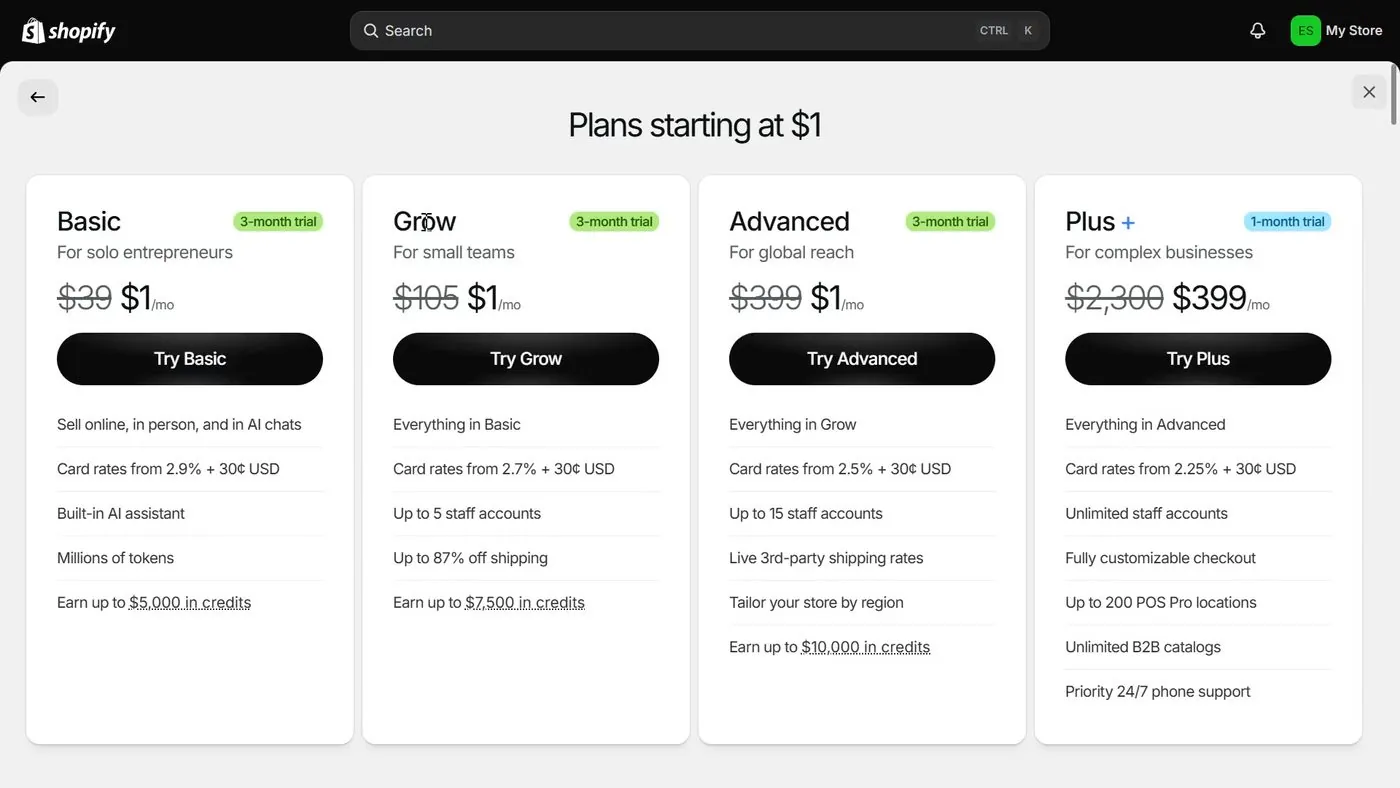
Now the $1 offer. Shopify's pricing page says most plans start at $1 a month for the first 3 months, then switch to standard monthly pricing. The plan picker in Shopify Ecom Store Pro's video showed the $1 price on Basic, Grow and Advanced. Plus, Shopify's top plan, showed a different offer.
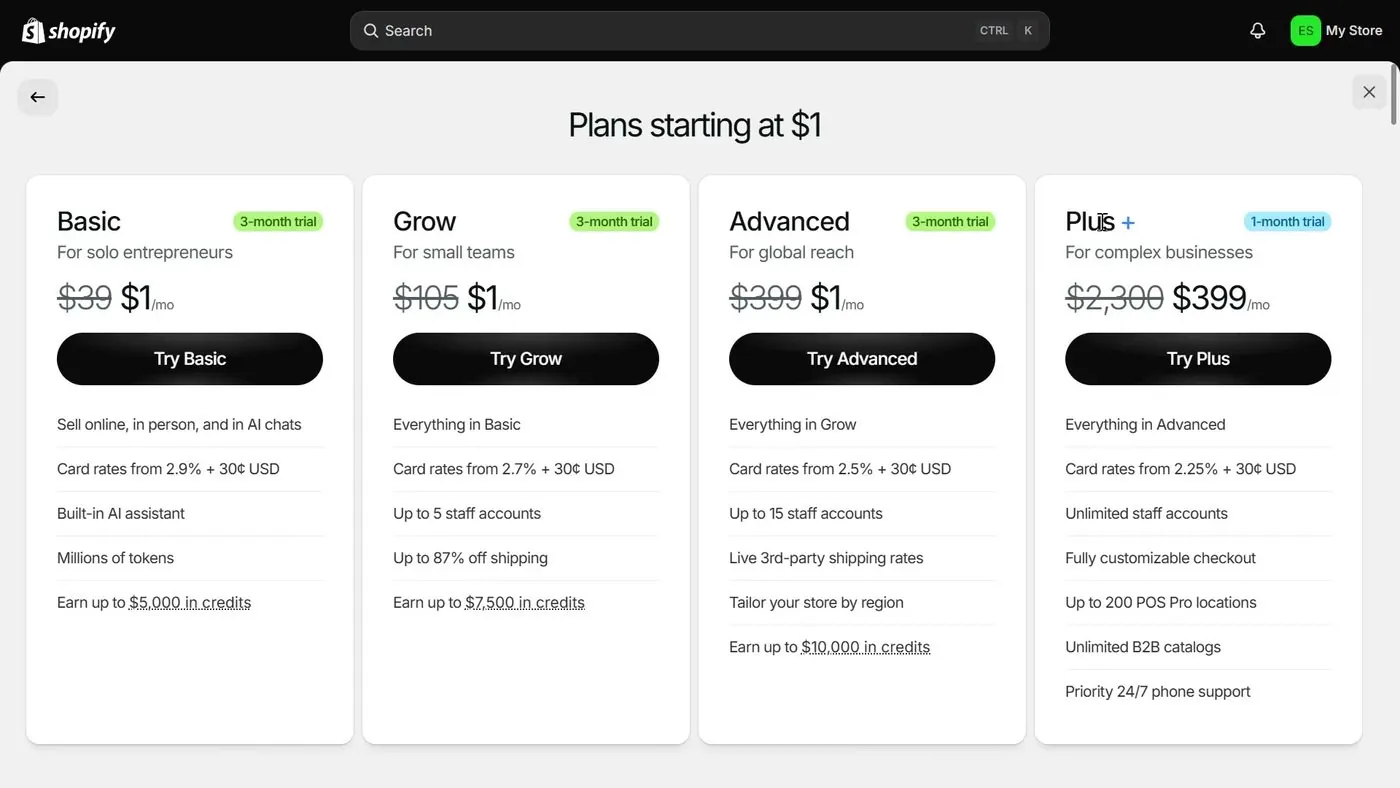
Shopify's plan picker lists four plans, each with its regular monthly price crossed out, September 2026, from Shopify Ecom Store Pro's video.
So which one should you pick? In my opinion, Basic on monthly billing is the safer start for a first store. Paying monthly means you're not paying for a full year before you know how the store goes. If you're sure you'll keep the store for the year, yearly billing lowers the monthly price. Shopify's Grow and Advanced plans, and the card rates on each, are in my Shopify plans guide. The full monthly bill is in my real monthly cost guide.
Something to note is that Shopify's help page says changing plans or billing cycles works differently while the $1 offer is running. So read the screen before you click. Checked October 15, 2026.
Where do you actually choose the plan?
- In the Shopify admin, click Settings in the bottom left corner, then click Plan.
- The Plan page shows "Trial" with the days left, and two buttons, Cancel trial and Choose plan.
- Click Choose plan to pick a plan and a billing cycle. You can also click Select a plan on the Home page.
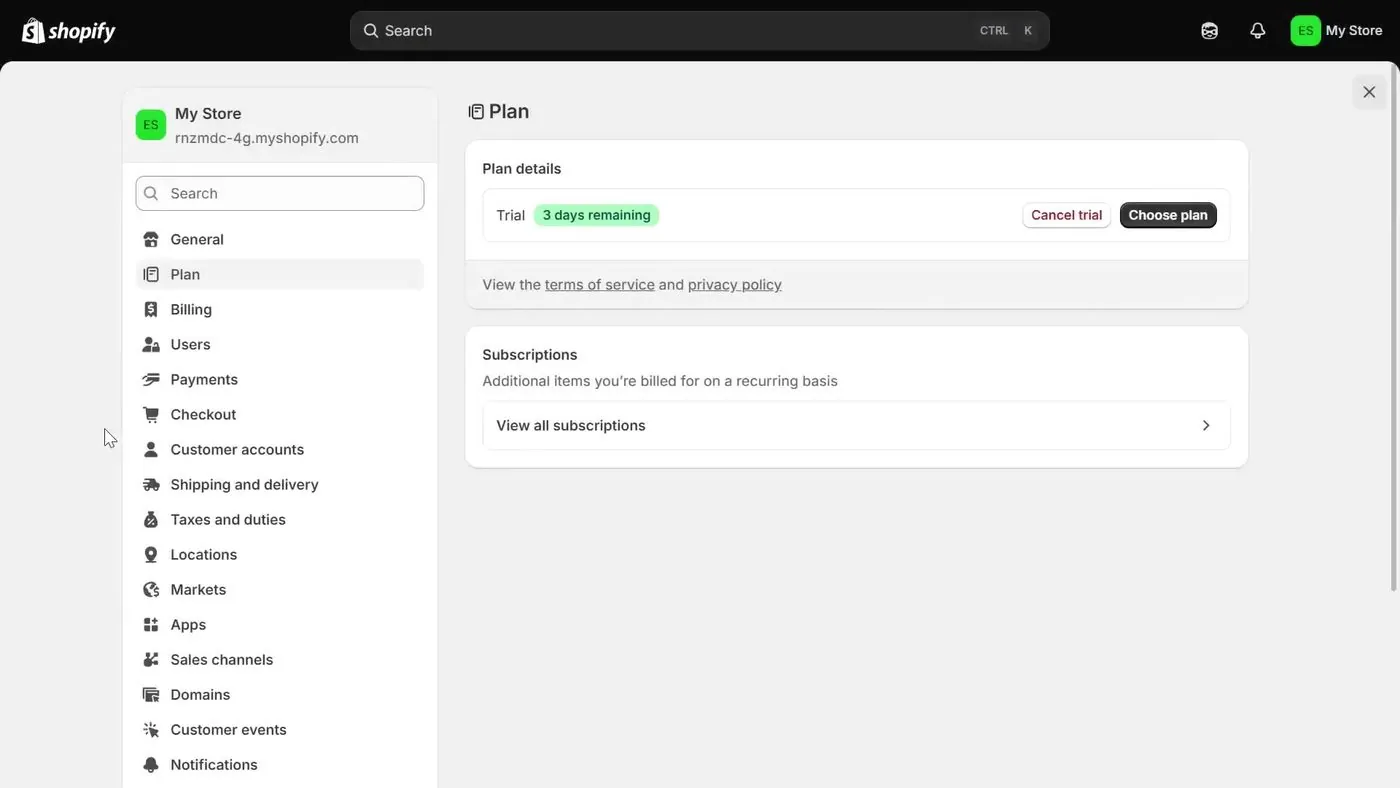
Shopify's Plan page in Settings shows the days left in the trial, September 2026, from Shopify Ecom Store Pro's video.
And if you never pick a plan, Shopify's help page says the store is paused until you choose one. If you decide to cancel during the trial without picking a plan, no action is needed and the account is frozen. If you add apps during the trial, their charges show up on your next invoice. Checked October 15, 2026.
Step 3: How do you add your first product?
So a product is anything you list for sale. Shopify's help page describes the steps as: go to Products, click Add product, enter a title and any other details, then click Save. Checked October 15, 2026.
- Click Products in the left menu, then click Add product. On the Home page you can also click Add product or Start with a sample product.
- Type a title and a description, then upload photos under Media.
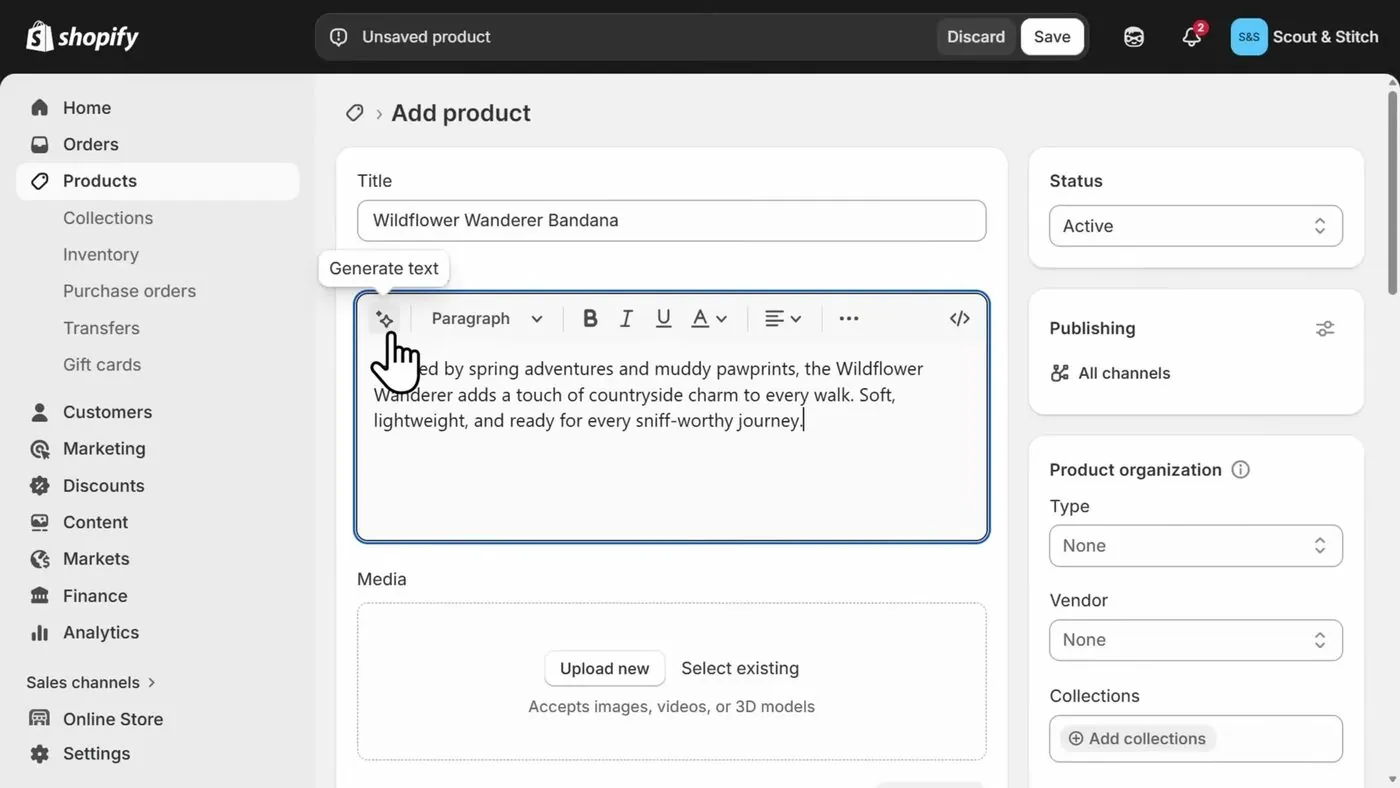
Shopify's Add product page starts with the title, the description and the photos, June 2026, from Kevin Stratvert's video.
- Scroll down to Price and type your price. The Category box above it tells Shopify what kind of product you're selling, and the screen says the category determines tax rates.
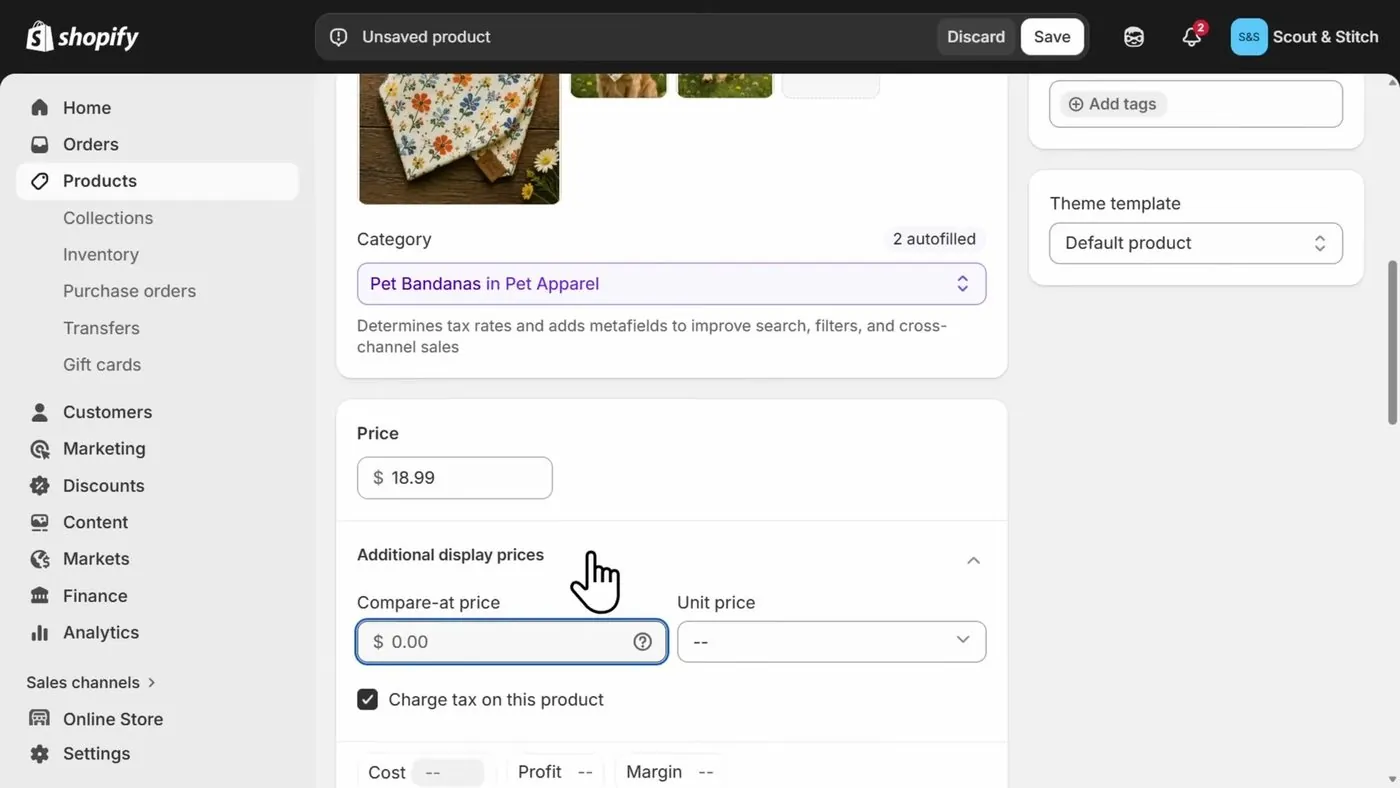
Shopify's category and price boxes, with the Charge tax on this product checkbox, June 2026, from Kevin Stratvert's video.
Now a few terms from that screen. The compare-at price is the higher "was" price that shows crossed out next to your price. Inventory is how many you have in stock. A variant is one version of a product, like a size or a color, and each variant can have its own price and quantity.
- Scroll to Inventory. Switch on "Inventory tracked" and type how many you have. "Sell when out of stock" was set to Off in Kevin Stratvert's video.
- Scroll to Shipping. Leave "Physical product" on if you ship it, and type the product's weight. In Kevin Stratvert's video, the host says to enter weights early because shipping rates use them.
- If the product comes in sizes or colors, scroll to Variants, click to add an option such as Size, and list the values, like S, M and L. Then give each one a price and a quantity.
- Click Save.
You can also import products. The Import button on the Products page asks how you want to import. You can upload a Shopify-formatted CSV file, which is a spreadsheet saved in Shopify's layout. Or you can import from another platform with a recommended app.
And a collection is a group of products, like "Dog Leashes" in Kevin Stratvert's video. Collections can fill themselves from a rule, such as "product title contains leash."
For me personally, I'd add one or two products before picking a theme, so the theme preview has something to show.
Step 4: How do you pick a theme and change how the store looks?
So a theme is the design template for your store. It sets the layout, the fonts and the look of each page. The Shopify Theme Store has a Free themes list, and paid themes show a price in the Theme Store. Checked October 15, 2026.
- In the Shopify admin, click Online Store under Sales channels. This page shows your current theme and an Edit theme button. It also has a Visit Theme Store button.
- To use a different theme, add it from the Theme Store. Then, on the Online Store page, find it under Draft themes and click Publish. You can also click Edit theme, then Publish at the top of the editor, then Publish again in the box that appears.
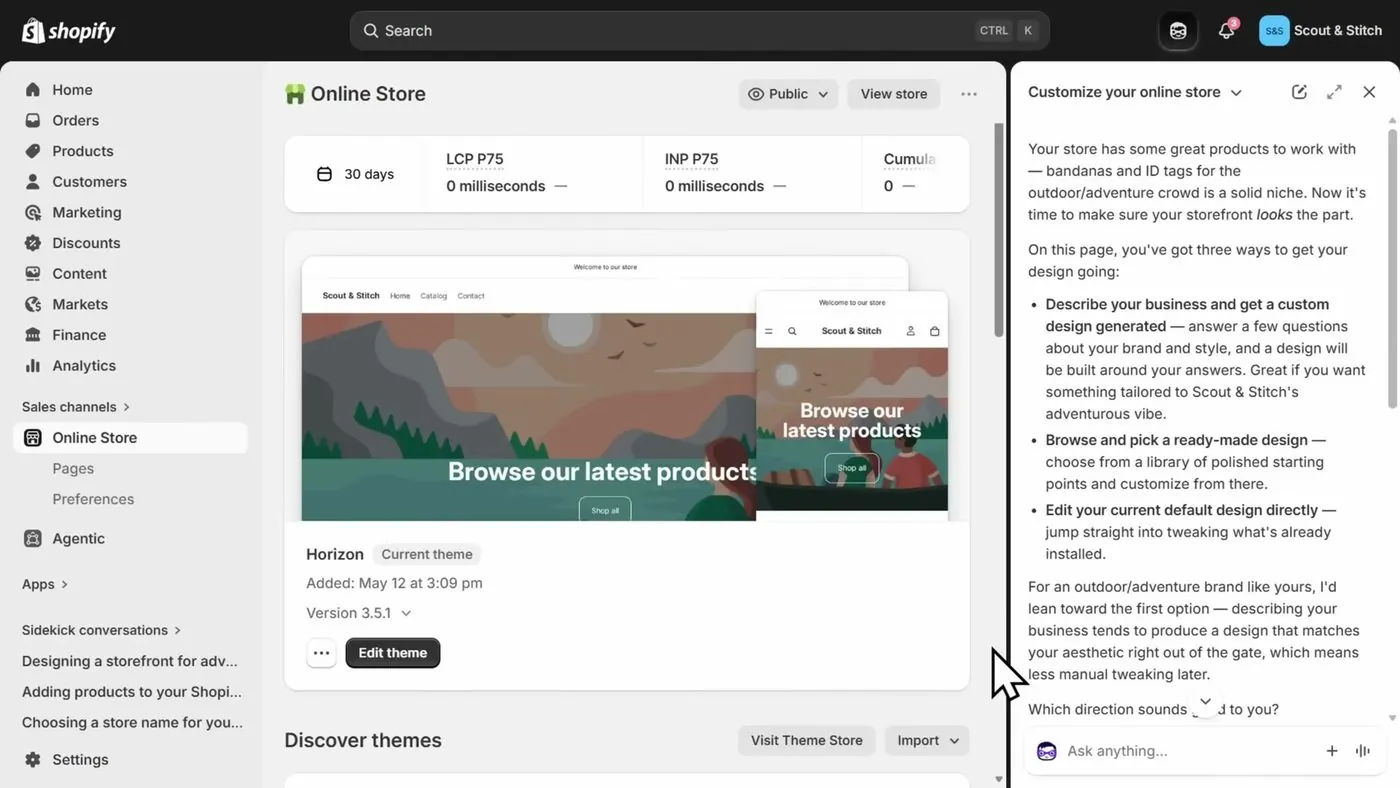
Shopify's Online Store page shows the current theme and the Edit theme button, June 2026, from Kevin Stratvert's video.
Shopify's help page says publishing a theme doesn't change who can see your store. If the store is in private mode, the store stays private after you publish. Checked October 15, 2026.
- Click Edit theme to open the theme editor. The left side lists the sections of the page, such as the announcement bar, header, hero image, featured collection and footer. The right side shows a live preview.
- Click a section, change the text, logo or picture, and click Save in the top right corner.
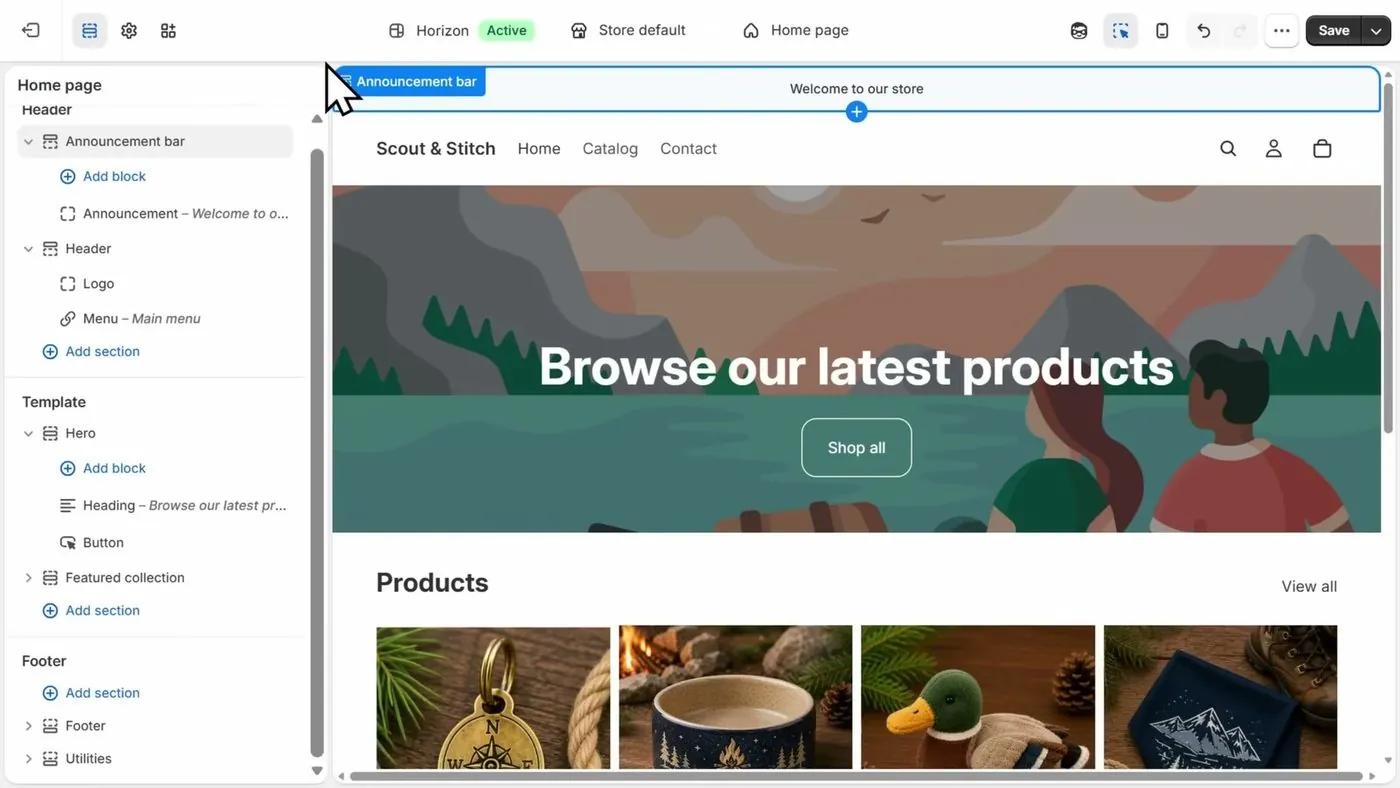
Shopify's theme editor lists the page sections on the left and previews the store on the right, June 2026, from Kevin Stratvert's video.
Basically, a product's text, price and photos live on the product page, not in the theme. So you change a product's details once on the Products page, and the store updates everywhere.
Now one trap. In Kevin Stratvert's video, the host points out that you can't edit the store's menu inside the theme editor. You go to Content, then Menus. And if you rename a menu link, the page it points to may need the new name too.
Step 5: How do you set your shipping rates?
So shipping rates decide what customers pay at checkout, and what you cover yourself. You set them in Settings, then Shipping and delivery.
- Click Settings in the bottom left corner, then click Shipping and delivery.
- In the Shipping profiles section, click the shipping profile you want to add rates to.
- Under Shipping zones, find the zone for your home country. Click an option to edit it, or click Add shipping option.
- Type a name, pick a rate type, type a price and pick a transit time. A flat rate means one price for every order.
- To offer free shipping above a certain total, tick "Offer free shipping" and type the minimum order amount.
- Click Done, then click Save.
Shopify's help page says it's slowly moving stores from shipping profiles to a newer setup called shipping options by market. So your Shipping and delivery screen may look a little different from the video. Checked October 15, 2026.
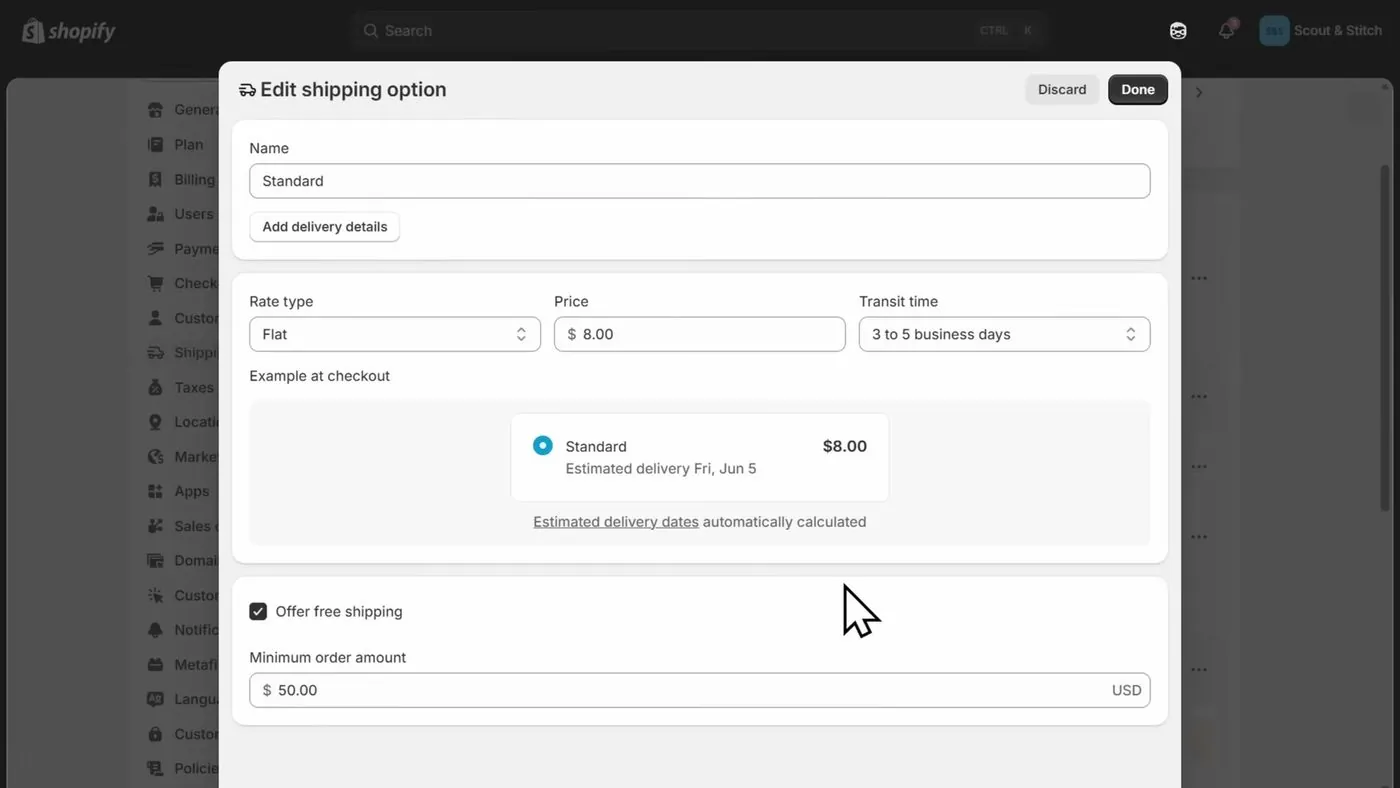
Shopify's Edit shipping option box, filled in with example numbers from the host's practice store, June 2026, from Kevin Stratvert's video.
Keep in mind that the $8 rate and the $50 free shipping line are example numbers from the host's practice store. Shopify doesn't set them as defaults for every store. Pick numbers that cover what the post office or courier will charge you.
Step 6: What do you need to do about taxes?
So Shopify has a Taxes and duties page in Settings. In Kevin Stratvert's video, the Tax service box showed Shopify tax services marked Active, and the United States row listed Shopify Tax. Basically, a tax service works out the sales tax at checkout.
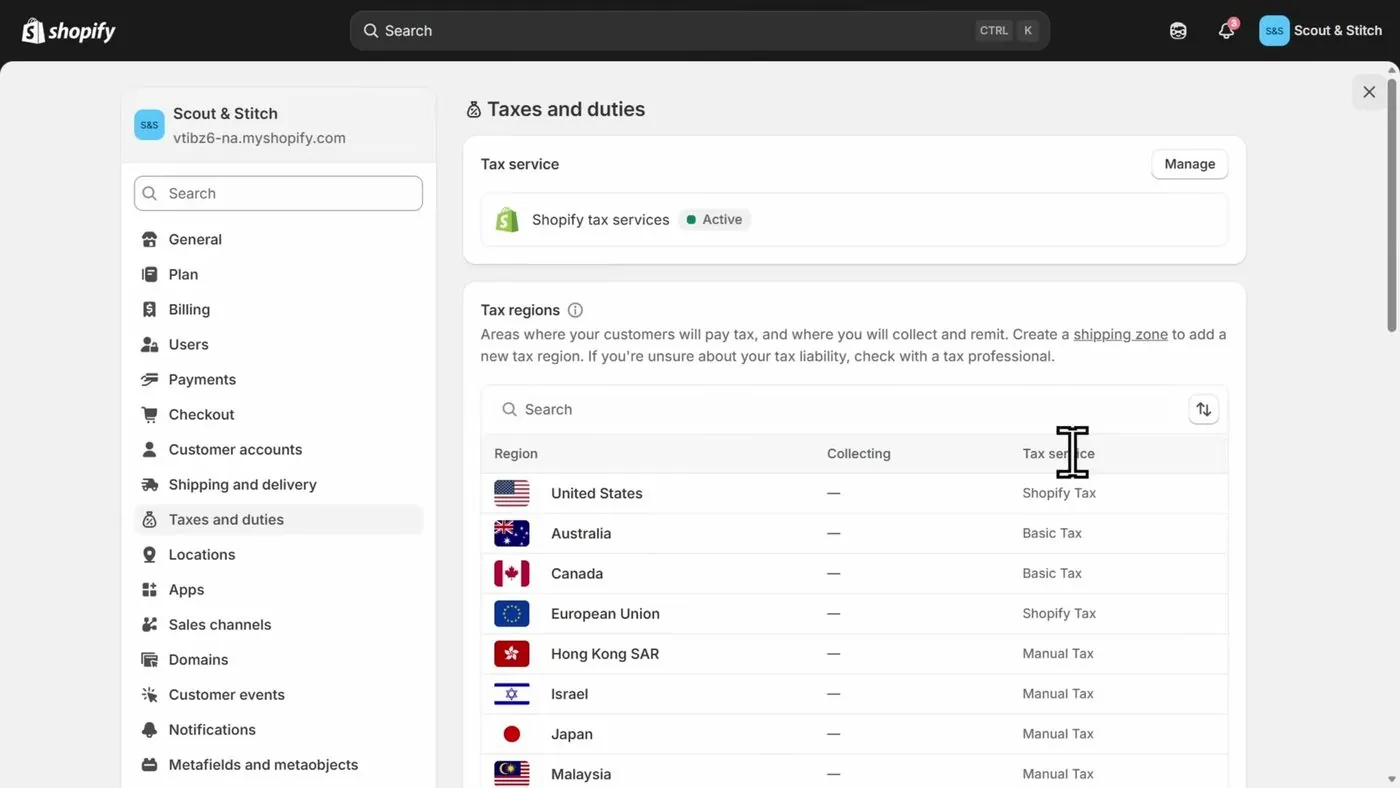
Shopify's Taxes and duties page lists the regions where tax is collected, June 2026, from Kevin Stratvert's video.
Keep in mind that in that screen the Collecting column was empty, so the store wasn't collecting sales tax yet. Shopify's US tax setup page says you turn on collection for each state where you're registered. Checked October 15, 2026.
- Click Settings, then Taxes and duties.
- Click United States, then click Add new state.
- Pick the state, type that state's sales tax ID and click Collect taxes.
Shopify's US taxes page also says Shopify doesn't file or pay your taxes for you, unless you use Shopify Tax and set up automated filing.
But which taxes you owe, and where, is a question of law, and the rules differ by state. The text on Shopify's own screen says to check with a tax professional if you're unsure about your tax liability. My guide doesn't tell you which taxes apply to your store. What I've written here is general information. A state tax agency or an accountant can confirm the rules for your state.
On the business side, you also don't need to form an LLC to start. My LLC and EIN guide covers that with the government pages behind each point.
Step 7: How do you set up payments so you can get paid?
So a payment processor is the company that takes your customer's card details at checkout and sends the money to you. Shopify's own processor is Shopify Payments. Shopify's help page says there's no third-party transaction fee when orders go through Shopify Payments. Checked October 15, 2026.
Now the Shopify Payments fee. On the Basic plan, Shopify Payments charges 2.9% plus 30 cents for online sales on standard cards. Shopify's pricing page lists a 2% extra fee on Basic if you use an outside payment provider instead of Shopify Payments. Both figures were checked on October 15, 2026, on the pricing page.
Turn on two-step sign-in first
Shopify's rule is that you must secure the account with two-step authentication to use Shopify Payments. Two-step authentication means you type a six-digit code, in addition to your password, when you sign in. An authenticator app on your phone makes the code. Shopify's help page also says payouts might be put on hold until two-step authentication is turned on.
- In the Shopify admin, click your store name, then click your profile, then click Security.
- In the Two-step authentication section, click Turn on two-step, type your password and click Next.
- Pick Authenticator app, scan the QR code with the app, type the six-digit code and click Turn on.
- Save the recovery codes Shopify gives you, in case you lose your phone.
Shopify's help page says a new admin design is rolling out, so your store name may sit in a different spot from Learn With Shopify's April video. Checked October 15, 2026.
Start the Shopify Payments setup
- Click Settings, then Payments.
- In the Shopify Payments box, click Activate Shopify Payments. In Learn With Shopify's April video, the same button read Complete account setup.
- Pick how you run the store. The screen asks "I am running my store as:" and lists three choices.
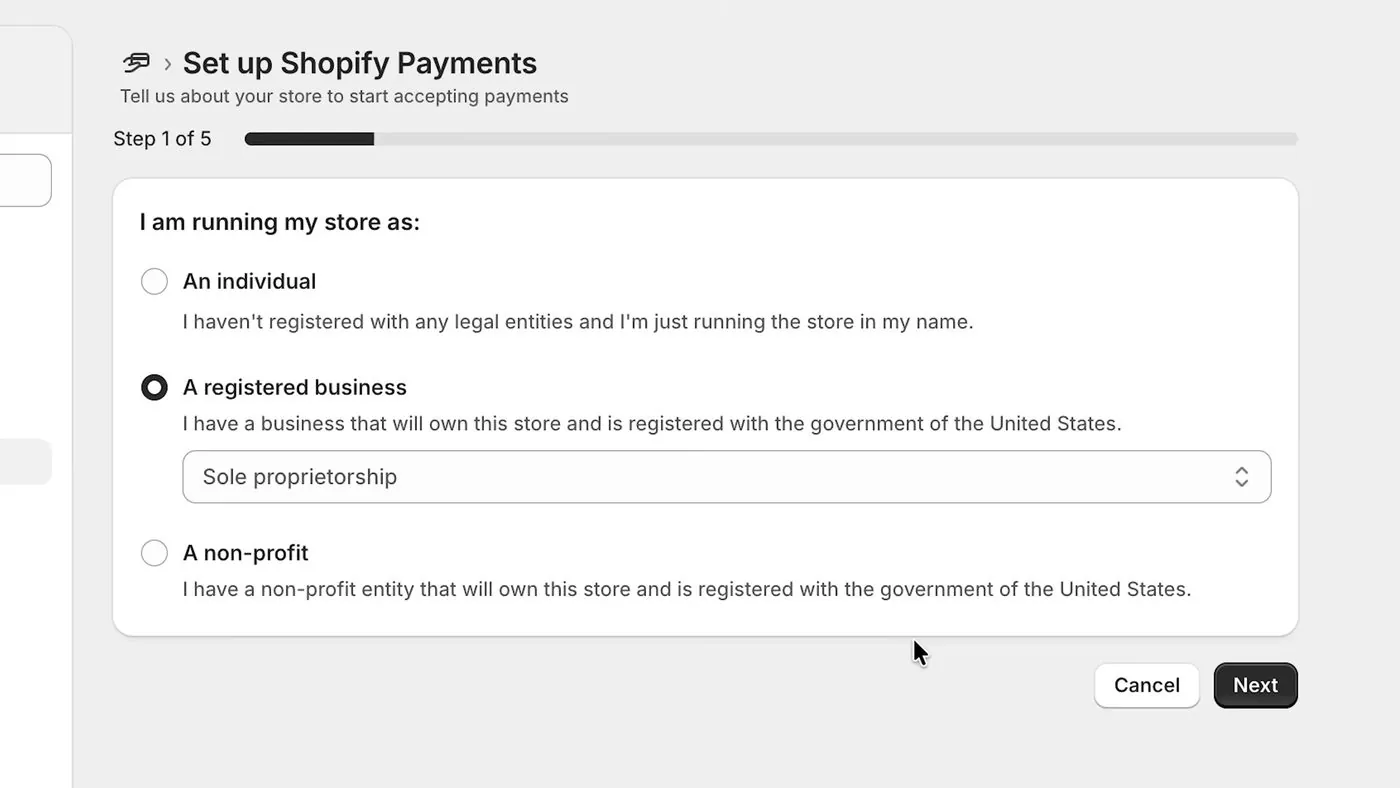
Shopify's business type screen offers An individual, A registered business and A non-profit, April 2026, from Learn With Shopify's video.
So here's how Shopify's help page says to choose. If you don't have an EIN and only have a Social Security number or ITIN, pick An individual. If you do have an EIN, pick A registered business, then choose the type from the menu under it. "Sole proprietorship" is one of the menu choices, and Shopify's help page defines it as a business owned by one person that's registered for an EIN. Those business type choices are Shopify's rules, not a law. My LLC and EIN guide explains the two paths.
- Fill in the account representative form. For a one-person store, that's you. Shopify asks for your legal name as it appears on your government ID, your date of birth and your SSN or ITIN. It also asks for your email, a US phone number and your US home address.
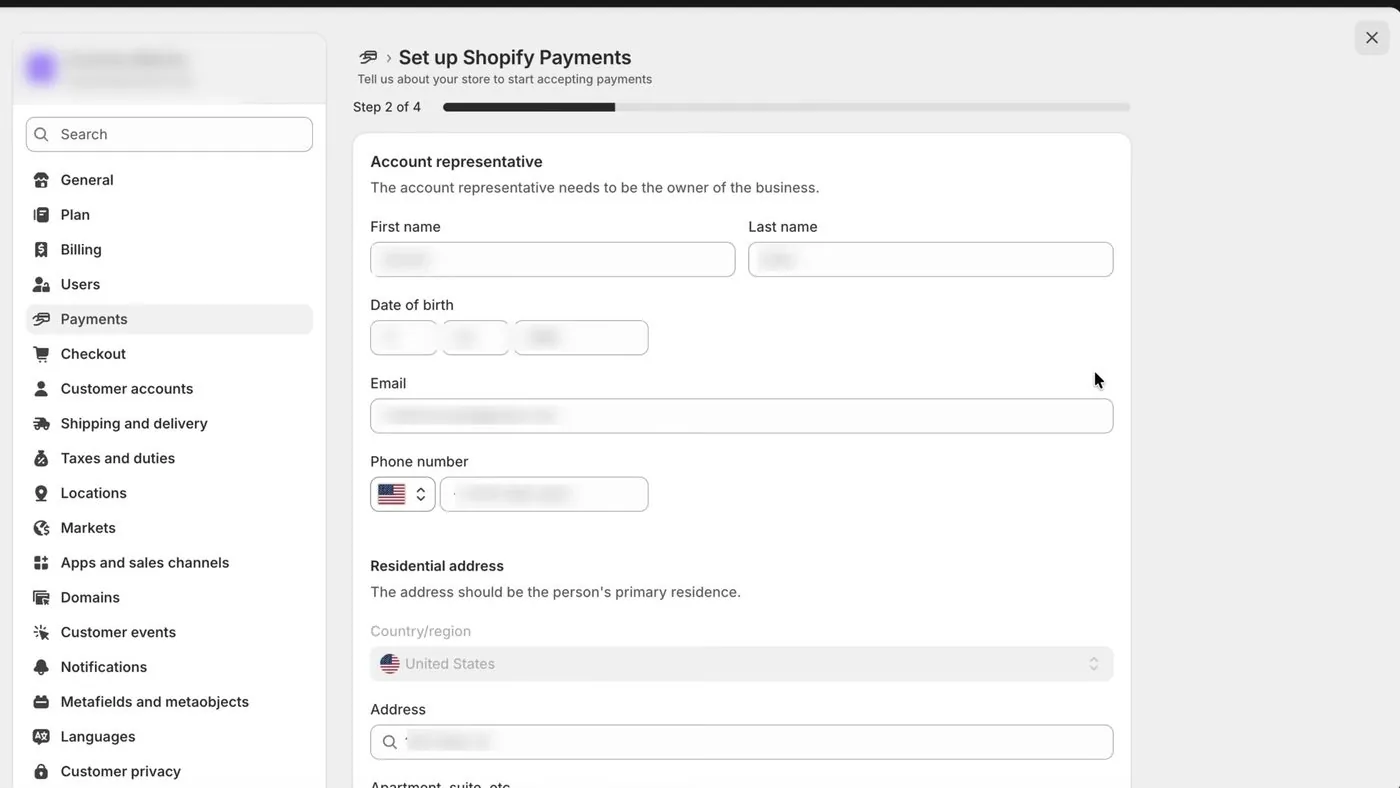
Shopify's account representative form asks for name, date of birth, email, phone and a home address, April 2026, from Learn With Shopify's video. The entries were blurred in the video.
The address box says the address should be the person's primary residence. Shopify's help page says the name, date of birth, SSN or ITIN and home address have to match your government documents. So type your name, date of birth, SSN or ITIN and address exactly the way they appear on your ID.
- Enter your business details, if the form asks for them, and the phone number you want to show on customers' bank statements.
- Review the business type and store details, click Confirm, then click Submit for verification.
What happens during verification?
Basically, verification is Shopify checking that you are who you say you are. Shopify says it and its banking partners are required to do this to follow regulations meant to prevent financial crimes. Shopify's help page says that if your details can't be confirmed, you can be asked for a photo ID. Checked October 15, 2026.
- Upload documents only through the secure banner in the Shopify admin. Shopify's help page says any documents sent through email or support chat are redacted and unusable.
- Take a photo of the document. Don't scan it, copy it or take a screenshot. Show all four edges, in color.
- Make sure the document matches what you typed.
- Shopify's help page says a review can take up to 24 hours, and the status shows "pending" until Shopify replies.
How do you add your bank account?
After Shopify verifies the account, you add the bank account that receives your payouts. A payout is the money from your sales that Shopify sends to your bank, in batches.
- Click Settings, then Payments.
- In the Shopify Payments box, click Add bank account.
- Either click Connect a bank account and follow the prompts to log in to your bank, or click Enter account details manually, type the details and click Save.
Shopify's help page says the bank account must be a full checking account at a US bank, in US dollars, that can accept ACH transfers. ACH is the standard bank-to-bank transfer system in the US. Savings accounts, checking accounts that accept only wire transfers, accounts that hold several currencies, and money transfer services aren't supported. A Shopify Balance account also works for payouts. Checked October 15, 2026. The page asks for a checking account and doesn't say it has to be a business account.
When does the money arrive, and what is a payout hold?
For a US store, Shopify's payout timing page lists a minimum settlement time of 3 business days, with no minimum payout amount. After the payout is sent, Shopify says it can take 1 to 3 more days to show up in your bank account. Checked October 15, 2026. Settlement times vary by country and risk level.
A payout hold means Shopify pauses sending your money while it checks something. Shopify's account holds page says your store keeps working during a hold, but you can't receive payouts until the reason is fixed. The reasons listed include missing information, wrong bank details and unsupported business types.
I should say that some sellers report long waits. In May 2026, one seller wrote on the Shopify Community forum that a failed automated identity check went to manual review and payouts were frozen. That's one seller's report, and it doesn't tell you how often it happens. The best way to avoid a delay is to match your details to your ID exactly.
How do you test the checkout?
Shopify's help page says to place at least one test order while you set up the store, because charges don't apply to test orders. Shopify Payments has a test mode. Shopify's testing page says you can use it only after you've chosen a paid plan and finished the Shopify Payments setup.
- Click Settings, then Payments.
- In the Shopify Payments section, click Manage. Shopify's launch page calls this button Edit, so your screen may show either name.
- In the Test mode section, select Enable test mode, then click Save.
- Place an order on your store with a test card number from Shopify's testing page.
- Turn test mode off again, or the store can't take real payments.
One thing to note is that Shopify's testing page says not to fulfill test orders, because you're charged for any shipping labels you buy. Checked October 15, 2026.
What does getting paid cost on the Basic plan?
So here are card fees only, for three different months of sales. I assumed an average order of $50, the Basic plan, Shopify Payments, and US cards used online. The $50 order size is my assumption, not a Shopify number. The fee on each order is 2.9% of the sale plus 30 cents, checked October 15, 2026. To redo the math, multiply the month's sales by 0.029, then add 30 cents for each order.
| Sales in a month | Orders at $50 | 2.9% of sales | 30 cents per order | Card fees |
|---|---|---|---|---|
| $1,000 | 20 | $29.00 | $6.00 | $35.00 |
| $3,000 | 60 | $87.00 | $18.00 | $105.00 |
| $5,000 | 100 | $145.00 | $30.00 | $175.00 |
These numbers leave out the plan price, apps, a domain, refunds and shipping. My real monthly cost guide adds those up.
Step 8: Do you need to buy a domain name?
So a domain name is your store's web address, like yourstore.com. You don't have to buy one to launch, because every Shopify store comes with a free address ending in myshopify.com. Checked October 15, 2026, on the pricing page.
If you want your own address, you can buy one through Shopify or connect one you already own.
- Click Settings, then Domains.
- Click Buy new domain, or click Connect existing if you already own one.
- If you're buying, type the name you want and review the available endings and their prices.
- Click Buy next to the one you want. Review the purchase summary, pick a payment method and click Buy domain.
- Check your email and verify your email address. Shopify's help page says you need to do this to finish the registration, and a new domain can take up to 48 hours to start working.
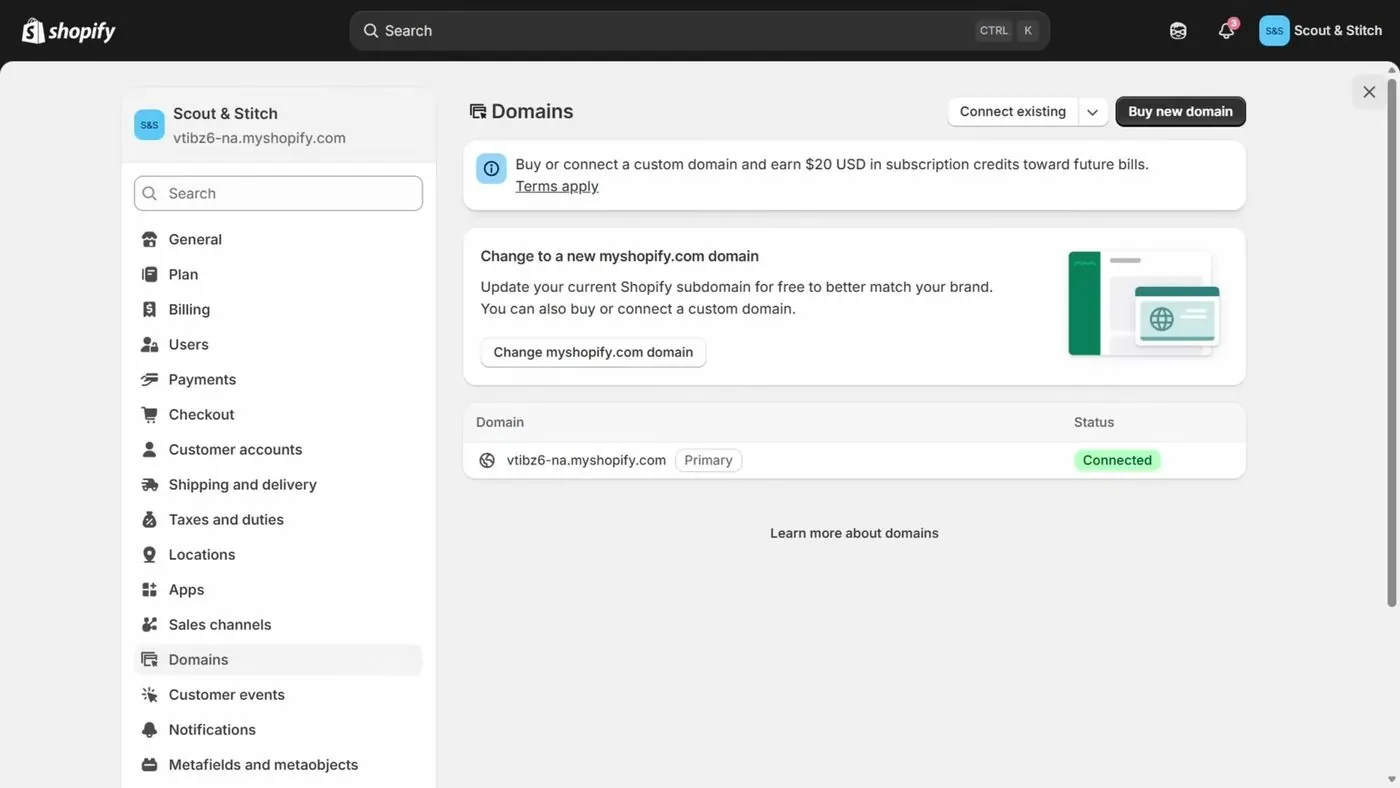
Shopify's Domains page has the Buy new domain and Connect existing buttons, June 2026, from Kevin Stratvert's video.
Now the money. Shopify's domains page says domains typically start at $9 a year, billed annually. The price depends on the ending, such as .com, and whether the name is considered premium. That price includes registration, renewal and free WHOIS privacy, which hides your personal contact details from the public domain record. Shopify's help page says some domain endings don't include WHOIS privacy, so check the ending you pick. Checked October 15, 2026.
Keep in mind a few rules from Shopify's help page, also checked October 15, 2026. A domain bought through Shopify is registered for one year and renews automatically unless you turn that off. The renewal is billed separately from your plan. The purchase is non-refundable, and you can't change the address after you buy it. Shopify shows the exact price before you pay.
Step 9: Which store policies and contact details do you need?
So Settings has a Policies page. The screen lists a return and refund policy, a privacy policy, terms of service, a shipping policy and contact information. In Learn With Shopify's video, the privacy policy said "Automated" and contact information said "Required."
- Click Settings, then Policies.
- Click each policy under Written policies. For the return and refund policy, terms of service, shipping policy and contact information, Shopify's help page says you can turn on Use automated policy. Shopify then writes the policy from your store settings and keeps it updated. Or leave it off, write your own and click Save.
- Click Manage next to Return rules if you want to set a return window, who pays return shipping and whether you charge a restocking fee. The return window choices include 14 days, 30 days, 90 days, unlimited and custom.
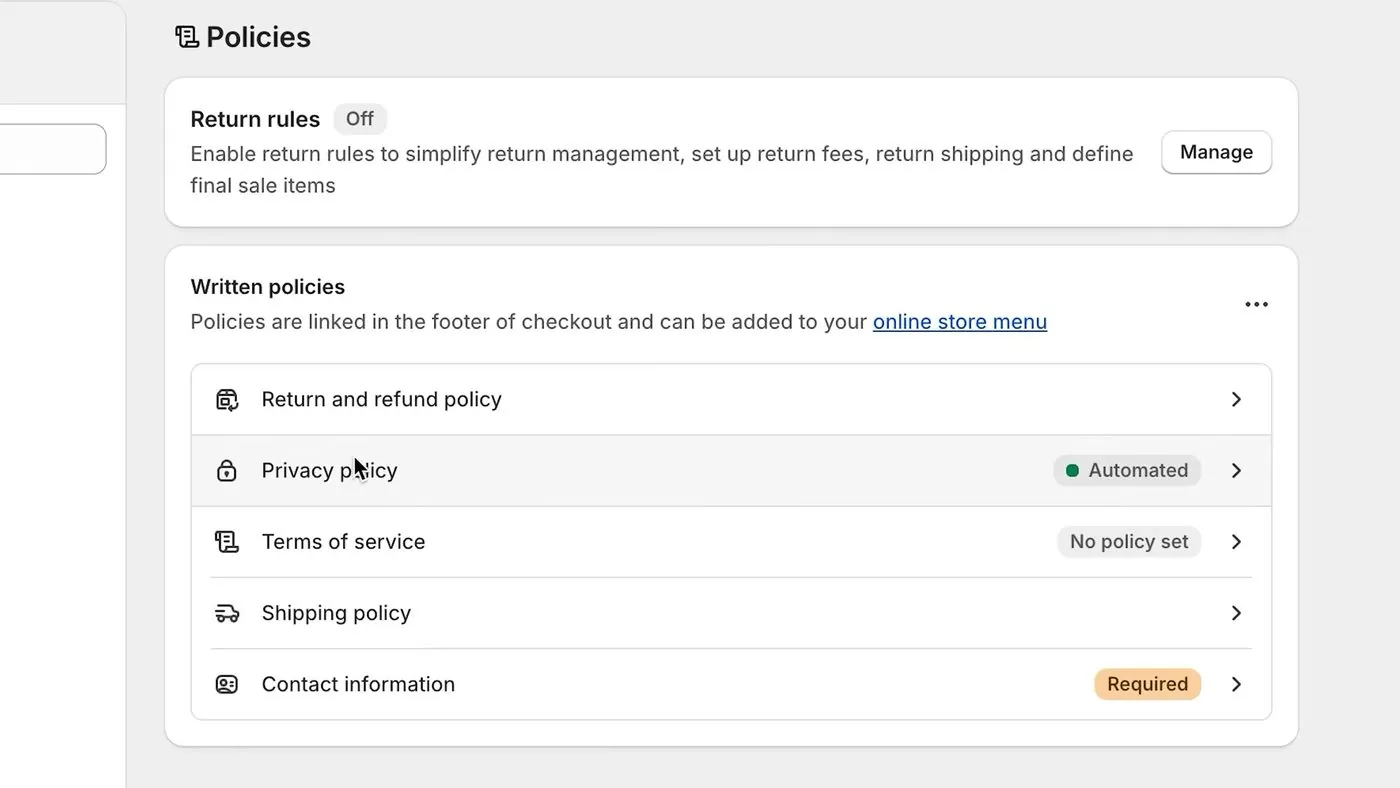
Shopify's Policies page lists the written policies and shows which one is marked Required, April 2026, from Learn With Shopify's video.
Learn With Shopify's video is from April, and Shopify's store policies help page now describes the Use automated policy switch, so your Policies screen may look a little different. Checked October 15, 2026.
One thing to note is that Shopify's help page says its policy templates aren't legal advice. So treat a template as a starting point. A lawyer can tell you what your policies should say for your state.
And keep in mind that your policies are public. Shopify's help page says they often include your address, phone number and email, so it suggests using business contact details if you run the store from home.
Step 10: How do you remove the password and launch the store?
So a new store starts in private mode. Basically, private mode hides the store from the public. Shopify's help page says that during the free trial your pages are hidden from visitors and a landing page with a password option shows instead. Checked October 15, 2026.
Before you can launch, Shopify's help page lists three required steps.
- Select a subscription plan. If you pick a plan during the free trial, Shopify says you won't be charged subscription fees until the trial ends.
- Add a store address in Settings, then General, in the Business details section.
- Set up a payment method, with test mode turned off.
Then you preview the store. Click Online Store under Sales channels, then click Preview store. The preview opens in a new tab and shows the store as customers will see it.
When you're ready, Shopify's help page lists these ways to launch. Any one of them works.
- Click Launch store on the admin Home page, on the Online Store page or in the theme editor.
- Go to Online Store, click Private, choose Public, then click Launch store.
- Go to Online Store, then Preferences. In the Store access section, turn off the Private mode setting and click Save.
In Learn With Shopify's April video, the Preferences page named the same switch "Password protection." The Preferences page looked like this.
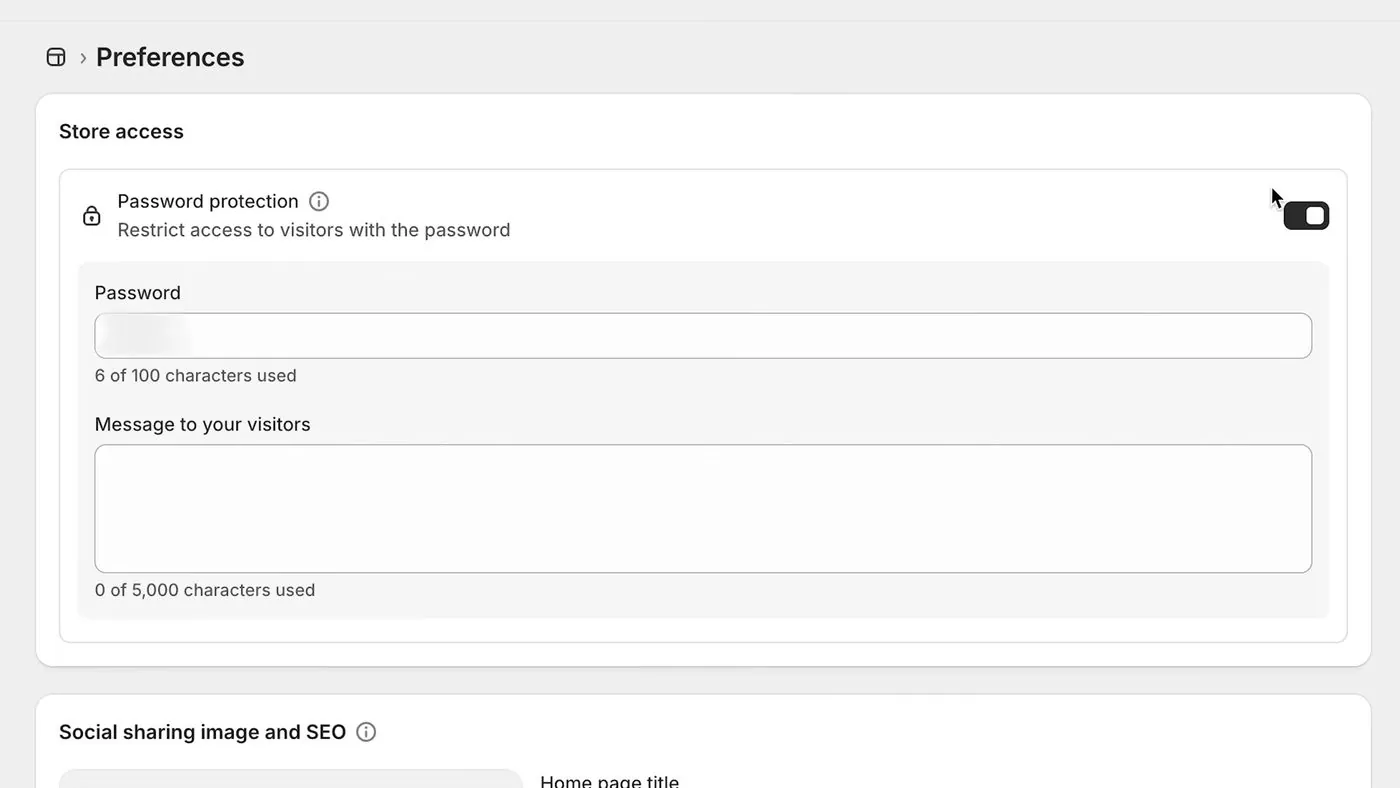
Shopify's Preferences page in April 2026 had a Password protection switch under Store access, from Learn With Shopify's video. Shopify's help page now calls this the Private mode setting.
So your Preferences page may look a little different from the video. Follow the Private mode setting that Shopify's help page describes. After you launch, the store is public and customers can check out.
Is Shopify too hard if you're not good with computers?
So in my opinion, the screens aren't technical. Most of them are forms where you type a name, a price or an address. You don't write code.
What trips people up is the order of the work. Choosing a plan, setting up payments, adding a store address and taking off the password are four separate steps, and Shopify doesn't put them in one list. Payments verification is also the one step where a mismatch with your ID can slow things down.
In 2023, a first-time seller wrote on a Shopify Community thread that the help links felt like "a snowstorm of information." That's why I put the steps in order on this page. The thread is older, so some details have changed.
When is Shopify the wrong choice?
- If you want shoppers to find you without any work. On a marketplace like Etsy, buyers already browse. On Shopify, you bring the visitors. My Shopify vs Etsy guide compares the two.
- If the price of a monthly plan doesn't fit yet. The $1 months are cheap, but the Basic plan is $39 a month after that, checked October 15, 2026. If that doesn't fit your budget yet, it's worth waiting.
But otherwise, if you want your own store, your own address and control over how the store looks, Shopify's Basic plan is a reasonable place to start.
Videos worth watching before you start
And if you'd like to watch someone click through the screens, here are three videos. You can play each one right here, and YouTube's usual controls work. Under each video is a quick summary, so you can decide if it's worth your time.
Elizabeth Parker hosts a screen recording that builds a practice store for dog accessories from signup to plans. The video's description has a Shopify sign-up link and says some of its links are affiliate links. That means the channel gets a small commission if you buy through one of them.
- Products and collections: The host adds a product with variants, prices and stock, then builds collections from rules.
- Theme and editor: The host picks a theme and edits the announcement bar, header, hero image and menu.
- Payments, shipping and taxes: The host sets up Shopify Payments, edits a flat shipping rate and shows the taxes page.
- Domain and policies: The host shows where to buy or connect a domain and how to set a return policy.
- Plans: The last minutes cover Shopify's plans. The video shows Grow at $79 and Advanced at $299 a month paid yearly. Shopify sometimes shows different visitors different prices for Grow and Advanced, so check Shopify's pricing page for yours.
A screen recording of a new US account from the email box to the Settings pages. The video's description has a "Try Shopify" link that looks like an affiliate link, so the channel may get a commission if you sign up through it. The description doesn't say whether it is. The description also says the voice is computer-generated and the screen recording is real.
- The offer on the form: The video shows 3 days free, then 3 months for $1 a month.
- The card screen: The video shows the fine print about renewing on Basic at $39 a month, and the Skip button.
- The plan picker: The video shows Basic, Grow and Advanced side by side, then the Compare plans table.
- Settings: The video shows the Plan page with Cancel trial and Choose plan, and the Billing page.
Shopify's own channel walks through the whole job, with a presenter on camera between the screen recordings. Skip ahead to the parts you need.
- 2:00, signup questions: The video shows the account screens and the setup questions.
- 18:30, payments: The video shows turning on two-step sign-in and setting up Shopify Payments.
- 44:30, pre-launch checklist and test orders: The video goes through a checklist and places test orders before launch.
- 48:30, launch: The video removes the password through the older Preferences page.
So ultimately, what should you do first?
So ultimately, create the free trial account, click Skip on the card screen, add one product and look around the admin before you pay anything. Then pick Basic when you're ready to sell, and set up payments with your details matching your ID exactly. And if the rest of the steps feel like a lot, you can do them one at a time, because Shopify keeps your work when you choose a plan.
Have a question about “How to start a Shopify store, step by step, if you've never sold online”?
Ask it here. Every question comes to me first. I answer as many as I can, and each answered question goes on this page with my answer so other people starting a store can see it too. I don't ask for your email, so check back on this page for the answer.
More shopify guides
Is Shopify's $1 for 3 months offer real, and how do you avoid being charged?
A walk through the real signup screens, the exact fine print, the price after the $1 months, and the cancel steps.
Is Shopify worth it in 2026? What it costs, what sellers complain about, and who it fits
A straight answer for someone who has never sold online, with the fee math shown so you can redo it.
Shopify plans explained: Basic vs Grow vs Advanced, and which one a beginner should pick
Start on Basic. Here is what Grow and Advanced add, what each costs, and the sales level where paying more actually saves money.
- Shopify's pricing page: trial length, the $1 offer, Basic plan prices, card rate, third-party fee, hosting and security, checked October 15, 2026.
- Shopify Help Center: Trying Shopify with a free trial, checked October 15, 2026.
- Shopify Help Center: Adding and updating products, checked October 15, 2026.
- Shopify Help Center: Publishing themes, and the Theme Store, checked October 15, 2026.
- Shopify Help Center: Shopify Payments (two-step authentication rule and third-party transaction fees), checked October 15, 2026.
- Shopify Help Center: Setting up shipping zones and rates, checked October 15, 2026.
- Shopify Help Center: US taxes and Setting up US taxes, checked October 15, 2026.
- Shopify Help Center: Two-step authentication using an authenticator app, checked October 15, 2026.
- Shopify Help Center: Setting up your Shopify Payments account, checked October 15, 2026.
- Shopify Help Center: Shopify Payments requirements in the United States, checked October 15, 2026.
- Shopify Help Center: Payout timing and Account holds, checked October 15, 2026.
- Shopify Help Center: Testing Shopify Payments, checked October 15, 2026.
- Shopify Help Center: Buying a domain through Shopify and Shopify's domains page, checked October 15, 2026.
- Shopify Help Center: Adding store policies, checked October 15, 2026.
- Shopify Help Center: Preparing your Shopify store for launch, checked October 15, 2026.
- Shopify Community threads: payout hold report (May 2026) and first-timer thread (2023), checked October 15, 2026. These are individual seller reports.
- Screens from Shopify Ecom Store Pro (September 2026), Learn With Shopify (April 2026) and Kevin Stratvert (June 2026).
Online Store Buddy is an independent site. We're not affiliated with or endorsed by Shopify, Etsy, Amazon, WooCommerce, Wix or Squarespace. Those names are trademarks of their owners.