
Now a quick note on money figures. Prices and fees on Amazon change several times a year, and every price on this page was checked on October 16, 2026, for the US store, in US dollars. Check the linked Amazon page before you pay anything. We recheck these prices every month.
And one more note on wording. When I say "Amazon's rule," I mean something Amazon requires, not a law. When I say "in my opinion," that's my own view. Anything about taxes is general information, and I say so where it comes up.
Quick picks
What does it mean to sell on Amazon, and what do you get?
So selling on Amazon means you list products on Amazon's seller site, and Amazon shoppers find and buy them on Amazon.com. Basically, Amazon is a marketplace, which is a big shop where many sellers list products side by side.
The account you create is called a Seller Central account. Seller Central is the website where you list products, see orders and manage your account.
Now the trade-off. On a marketplace, shoppers are already there. But you follow Amazon's rules, and in my opinion Amazon owns the relationship with the shopper, not you. I compare that with running your own store in my Shopify vs Amazon FBA guide.
What do you need before you sign up to sell on Amazon?
So Amazon asks for a fair bit of paperwork up front. Amazon's registration guide lists these items (checked October 16, 2026).
- A government-issued photo ID. The signup screen in the September 2026 video says "Valid government issued ID or Passport."
- An email address. Amazon suggests a login email that is different from any email you already use as an Amazon shopper or Amazon Business customer.
- A credit or debit card. Amazon's list says "Internationally chargeable credit card." The card screen in the September 2026 video says only AMEX, Mastercard and VISA are accepted. Amazon's registration guide lists more card brands: American Express, Diners Club, Discover, JCB, MasterCard and Visa (checked October 16, 2026). So check the card screen in your own signup. Amazon says the card does not have to be in your name or your business's name.
- A bank account and routing number. This is where Amazon sends your sales money. Amazon says the bank account must be in your name or your business's name. A routing number is the nine-digit number that identifies your bank.
- Proof of home address from the last 180 days. Amazon's example is a bank or credit card statement.
- Tax information. Amazon calls this the Tax Information Interview. The taxes section below explains it.
- A mobile phone. A phone is not on Amazon's checklist. But the signup screen in the September 2026 video lists "Mobile phone," and a later screen asks for a number to send a PIN, which is a short code.
- A business license or registration, only if you have a registered business. If you sell as an individual, you don't have one to give.
Amazon also says documents must be high-quality color scans or photos that show all four corners and have readable text. Screenshots and blurry images aren't accepted.
Notice what's missing from the list. You don't need a product yet, and you don't need an LLC. An LLC is a type of company you register with your state. Amazon's own page says you do not need to be an LLC or a registered business to sell. My LLC and EIN guide explains when one makes sense.
Step 1: Which Amazon selling plan should you pick?
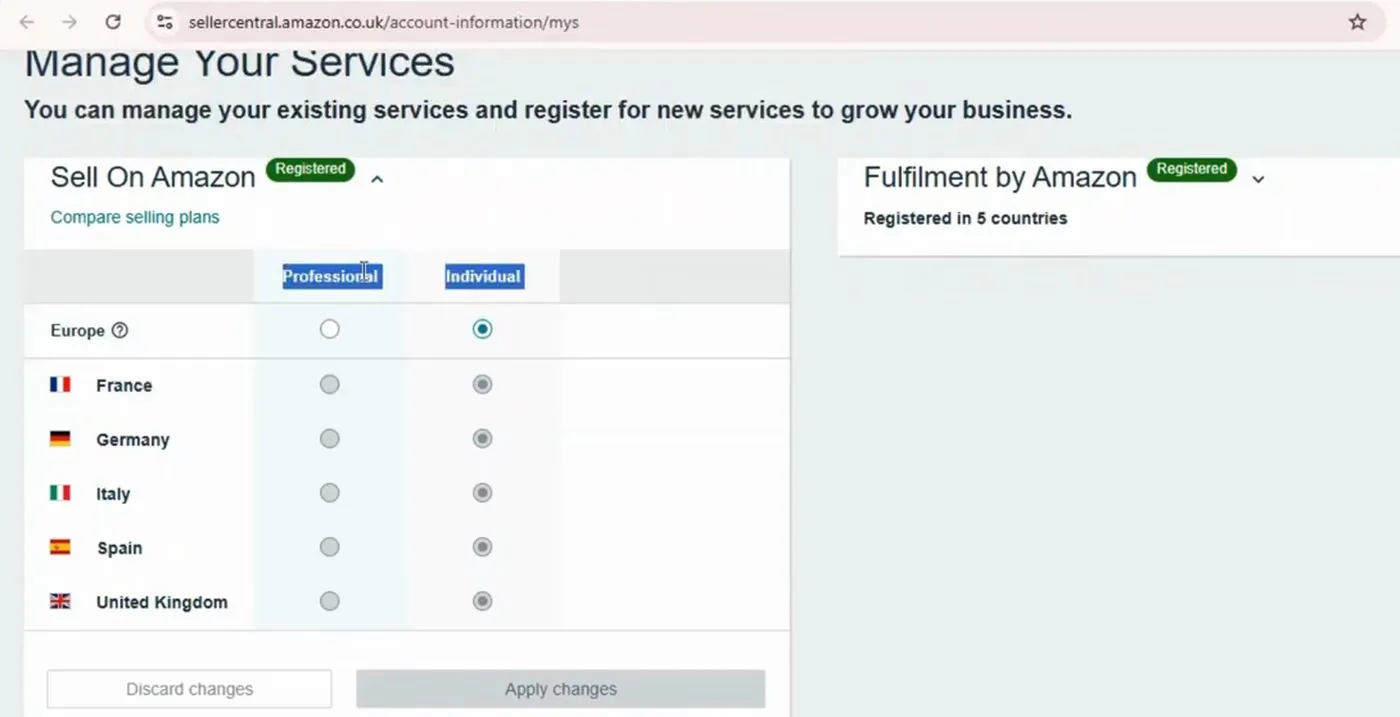
So Amazon has two selling plans, and you choose one at the start. Both figures below are from Amazon's pricing page, for the US store, checked October 16, 2026.
| Plan | What Amazon charges | What Amazon says about the plan | Checked |
|---|---|---|---|
| Individual | $0.99 for each item sold, plus selling fees | Amazon says the plan is for new sellers with lower sales volumes, under 40 items a month | Oct 16, 2026 |
| Professional | $39.99 a month, plus selling fees | Amazon's pricing page lists bulk listing tools, Amazon Ads and more on this plan | Oct 16, 2026 |
Sellers on both plans also pay a referral fee on each sale, which is Amazon's percentage cut of the sale price. Amazon's pricing page says the referral fee is a percentage of the total price or a minimum amount, whichever is greater. The percentage runs from 3% to 45% depending on the category, and most categories list a $0.30 minimum. Media items add a $1.80 closing fee (checked October 16, 2026). My Amazon seller fees guide covers referral fees and fulfillment fees in detail.
Now the break-even, which is the point where the two plans cost the same. The referral fee is the same on both plans, so only the Individual plan's $0.99 per item and the Professional plan's $39.99 a month matter here. To redo the math, multiply the items you sell by $0.99 and compare the answer with $39.99. That is my math, not a number Amazon prints.
| Items sold in a month | Individual plan: items x $0.99 | Professional plan |
|---|---|---|
| 10 | $9.90 | $39.99 |
| 40 | $39.60 | $39.99 |
| 41 | $40.59 | $39.99 |
| 100 | $99.00 | $39.99 |
These numbers leave out referral fees, any fulfillment fees, shipping, the products themselves and taxes. They show only the plan charge.
Amazon's pricing page says that after registration you can switch or cancel your plan at any time. In the September 2026 video, the big Sign up button on sell.amazon.com led to the Professional plan. The link for the Individual plan sat lower on the page, under the words "Just have a few items to sell? Sign up to become an individual seller." Amazon changes its pages, so look for both choices on your own screen.
One more thing that trips people up. Amazon's selling plan is a different choice from the business type you pick at signup. Step 4 shows the business type screen. My Individual vs Professional plan guide goes deeper on which plan fits which seller.
Amazon's pricing page also lists new seller offers. It says "Unlock $50K in new seller credits, bonuses, and exclusive benefits." It says a new-to-Amazon brand can get over $50,000 in automatic referral-fee waivers for the first year. And it shows "Get 10% back on your first $50,000 in branded sales" (all checked October 16, 2026). The conditions for these offers are on Amazon's incentives pages, so read them before you count on any offer.
What do Amazon's signup screens look like, in order?
So Amazon's registration guide starts with creating a login, then lists five steps: business information, seller information, billing information, store and product information, and identity verification (checked October 16, 2026). The progress bar on the card screen in the September 2026 video showed four stages instead: Business information, Seller information, Store and Verification. Amazon changes the names and order from time to time, so your screens may differ a little.
The screens below come from a September 2026 video of a new seller account, plus Amazon's registration guide. The person in that video picked the Professional plan and a registered business. So a few screens will look different if you pick the Individual plan or sell as an individual. Names, numbers and addresses on these screens are blurred or empty.
Step 2: How do you create your Amazon seller login?
So the first screen is a normal account form. You reach it from sell.amazon.com after you pick a plan.
- Go to sell.amazon.com and click the Sign up button for the plan you chose.
- On the "Create account" screen under the amazon seller central logo, type your name, your email address and a password. The password has to be at least 6 characters.
- Click the yellow Next button. Small print says that by creating an account you agree to Amazon's Conditions of Use and Privacy Notice.
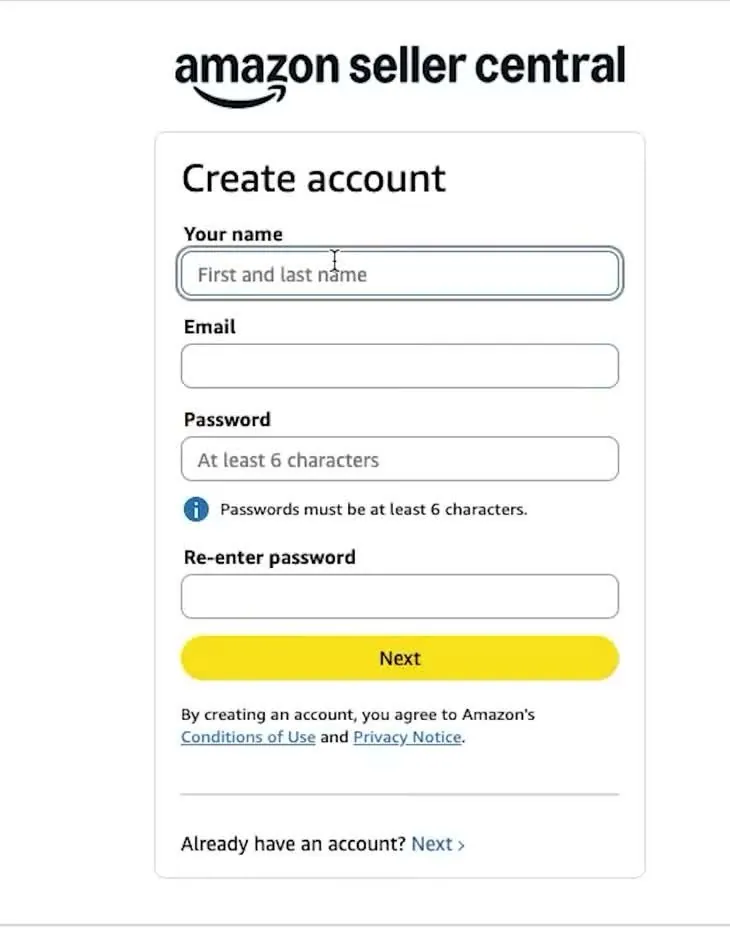
Amazon's Create account screen asks for a name, an email and a password, September 2026, from Travis Marziani's video.
A line at the bottom of the Create account screen says "Already have an account?" with a Next link, for people who already have a seller login. Amazon's registration guide suggests using an email that is different from the one on your shopper account.
Step 3: What does "You are applying to sell in the United States" mean?
So after the login, a welcome screen with a Get started button leads to the screen below. It tells you which Amazon store you're applying for. Amazon runs separate stores in different countries, and this screen says you can sell in other countries after you register.
- Read the screen. It says "You are applying to sell in the United States Amazon store (Amazon.com)."
- Click the orange Agree and continue button. Clicking it means you agree to the Amazon Services Business Solutions Agreement and Amazon's Privacy Notice, which the screen links to.
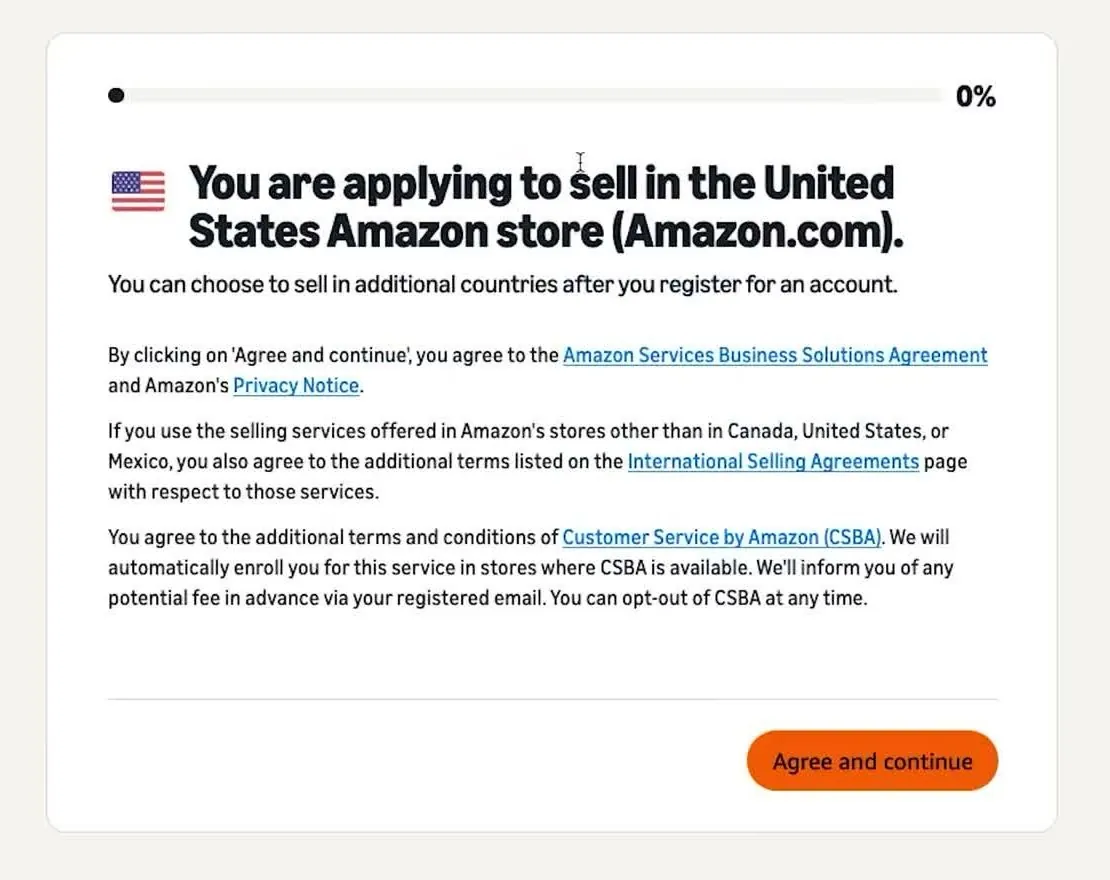
Amazon's screen naming the United States store, with a progress bar at 0%, September 2026, from Travis Marziani's video.
The fine print also says you agree to the terms of Customer Service by Amazon, and that Amazon enrolls you in that service where it's available. The screen says Amazon will tell you about any potential fee for that service in advance by email. Read those links before you click if you want the details.
The next screen asks where your business is registered. A line under the country menu says that if you don't have a registered business, you enter your country of residence.
Step 4: What business type should you pick?
So the business type screen asks "What type of business do you have?" It lists five choices.
- State-owned business
- Publicly-listed business
- Privately-owned business
- Charity
- Individual (I don't have a registered business)
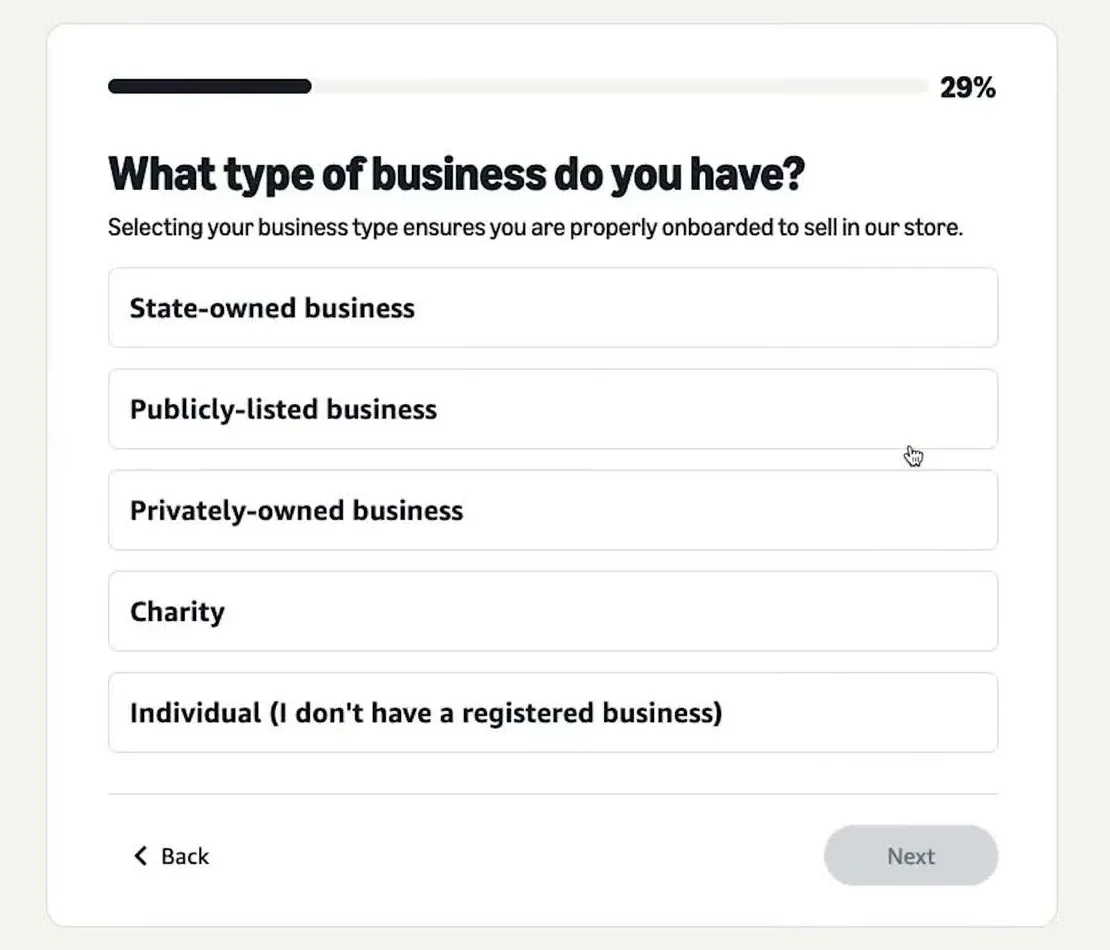
Amazon's business type screen, with the Individual choice at the bottom, September 2026, from Travis Marziani's video.
If you don't have a registered company, the Individual choice is the one that describes you. Amazon's registration guide words it as "None, I am an individual," so the wording changes between screens and dates. Both mean the same thing.
Keep in mind that the Individual business type is a different choice from the Individual plan in Step 1. A seller can pick the Individual business type and still sign up for the Professional plan. That's a combination one seller described in a June 2026 video, and Amazon's registration guide confirms that the business type is chosen separately.
The person in the video picked "Privately-owned business." So the screens in Steps 6 and 7 are the ones a registered business sees. The video doesn't show what an individual sees on those screens.
Step 5: What are the questions about your products and experience?
So the next four screens are short questions. Amazon's own screen for the category question says the answers help personalize your setup. Here's each one.
What types of products do you plan to sell?
Amazon's screen lists four choices. They are "Products branded by my business," "Products branded by another business," "Non-branded generic products" and "I don't have any products to sell yet." The screen says the information helps guide you through the requirements to list your first product, and that you can always change your selection.
Basically, "I don't have any products to sell yet" is a real choice on the screen. So you can finish registration before you pick a product.
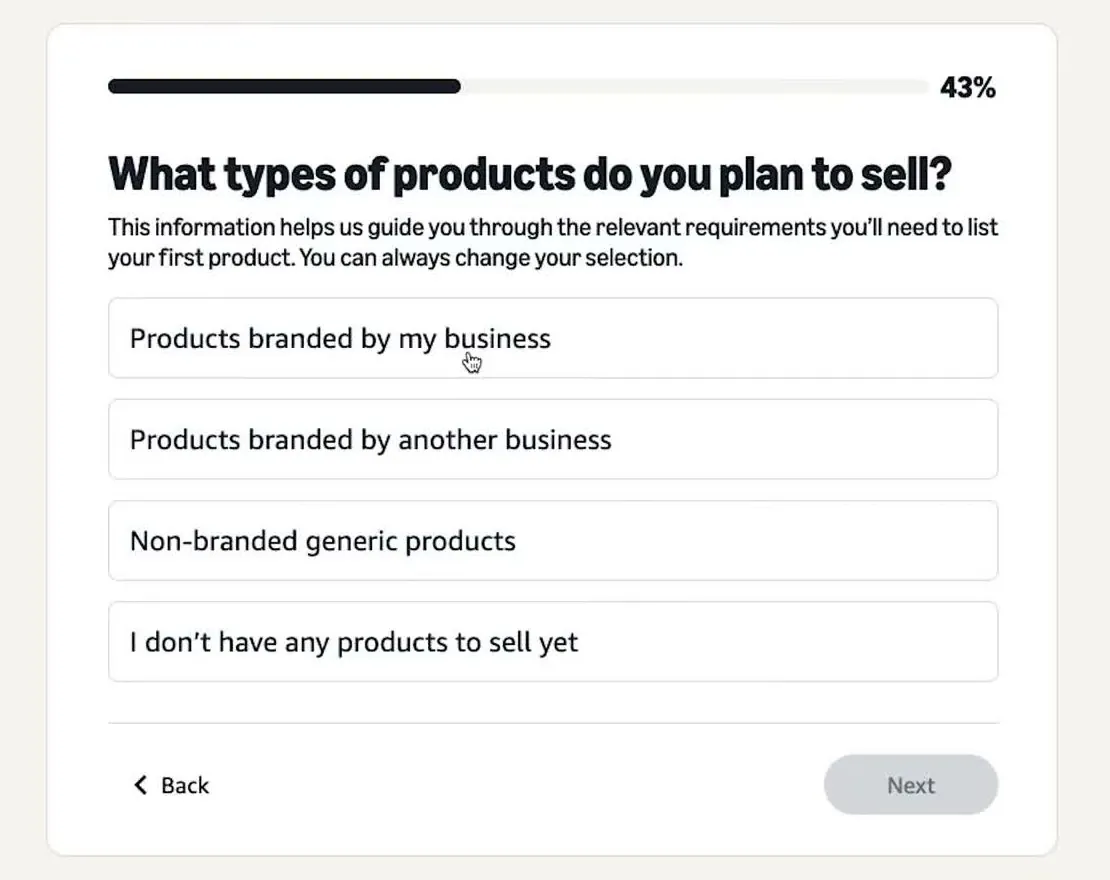
Amazon's product types screen includes a choice for sellers with no products yet, September 2026, from Travis Marziani's video.
If you choose "Products branded by my business," an optional box appears for your brand name, with an Add brand button.
Which product category do you plan to sell in?
This screen has a menu called "Select a category." The screen says you can sell in other categories as well. It has a Skip for now button, so you can skip the category question.
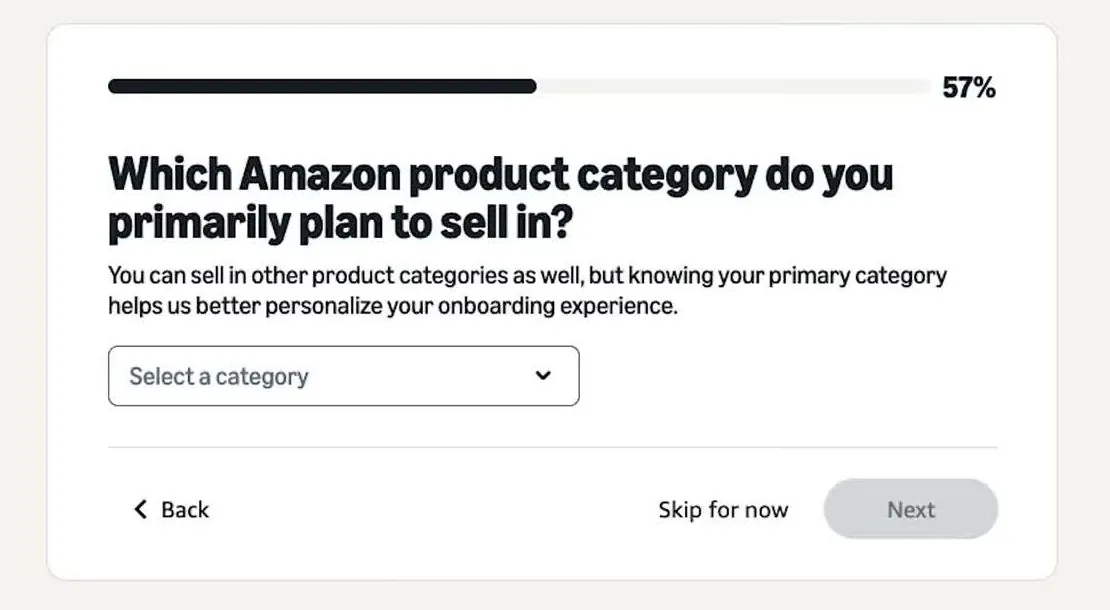
Amazon's category screen has a Skip for now button, September 2026, from Travis Marziani's video.
Which of these best describes your selling experience?
The three choices are "I haven't started selling products yet," "I sell my products in physical stores" and "I sell my products online." The last choice adds an optional website box.
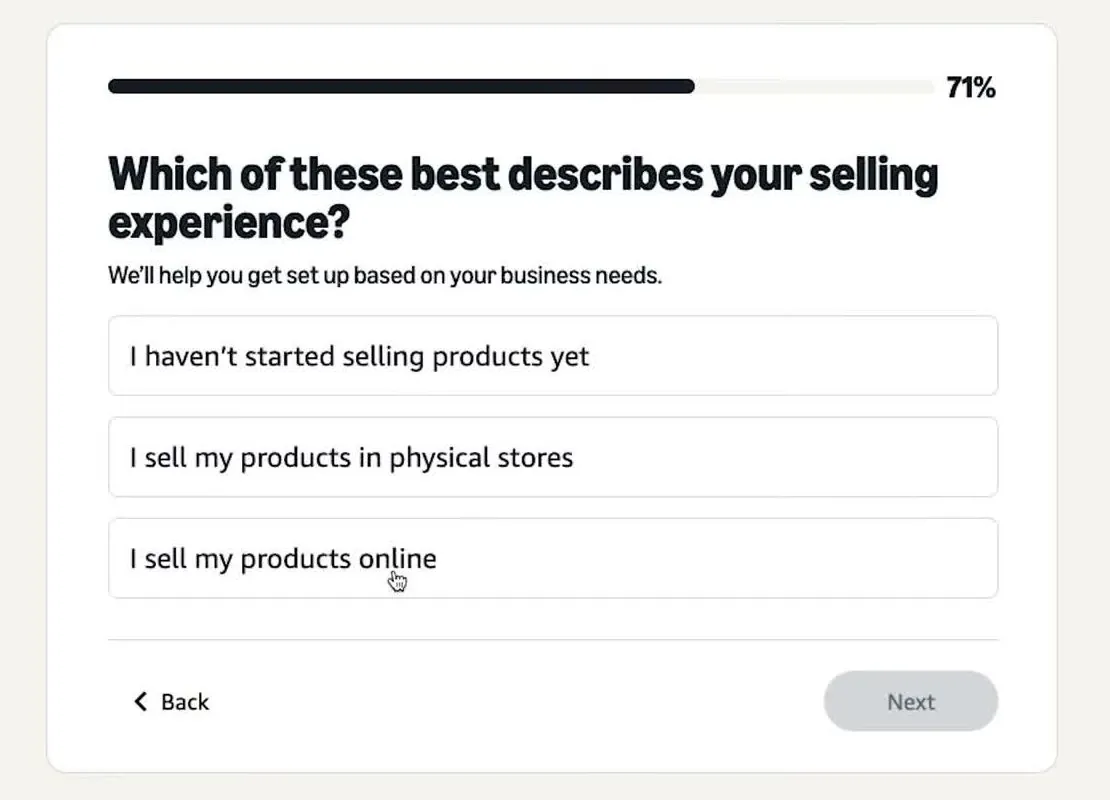
Amazon's selling experience question, September 2026, from Travis Marziani's video.
Do you sell to governments, schools or other businesses?
The four choices are "Yes," "No, but I'd like to," "No, and I don't plan to" and "I'm not sure." The screen says your products are shown to both retail and business customers, and that interested sellers get tips on reaching business buyers. The button on this screen reads Submit.
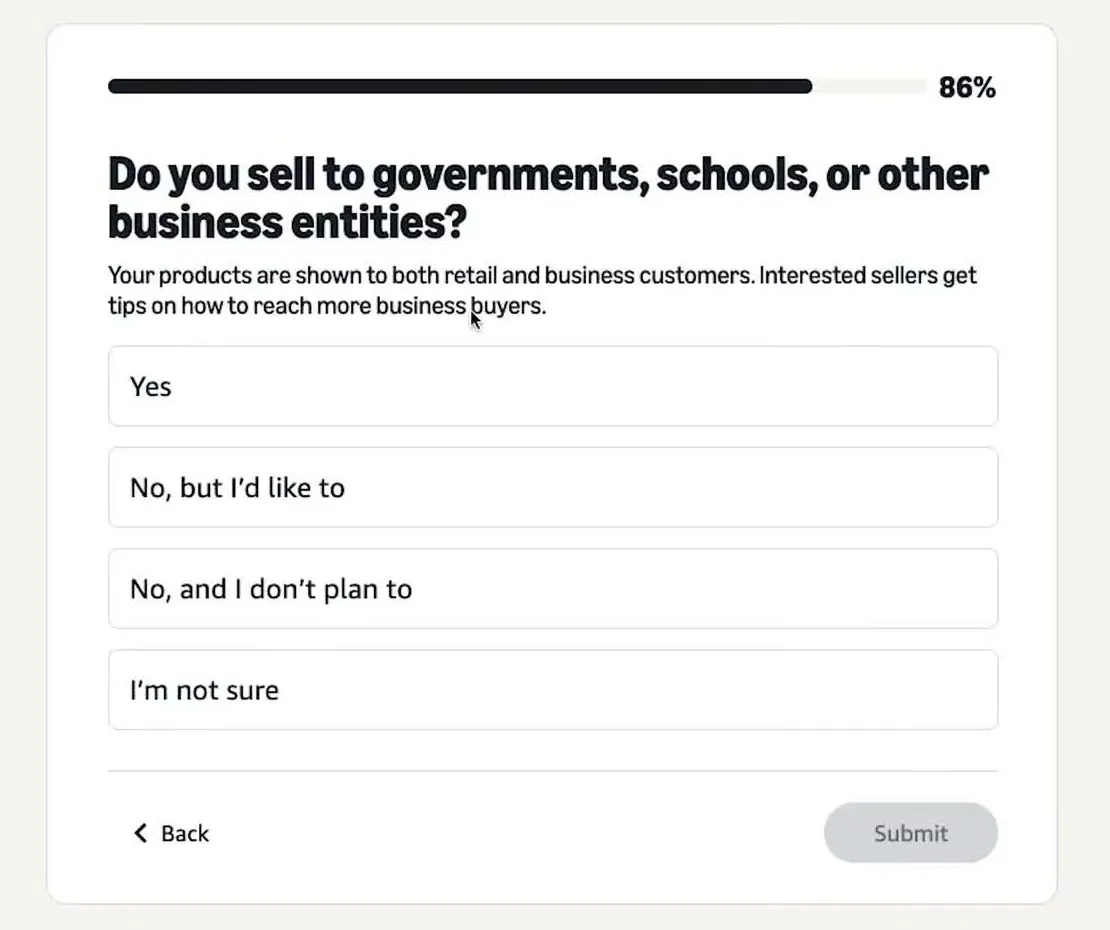
Amazon's last question before the setup list, September 2026, from Travis Marziani's video.
After this, a "Great start!" screen shows what to expect: provide your information and documents, Amazon verifies the submission, and you get verified and start selling. Click Start account setup.
Step 6: How do you enter your business information and verify your phone?
So the next screen is a checklist, and it's worth reading. It's titled "What you'll need to set up your account," and it repeats the items Amazon wants ready.
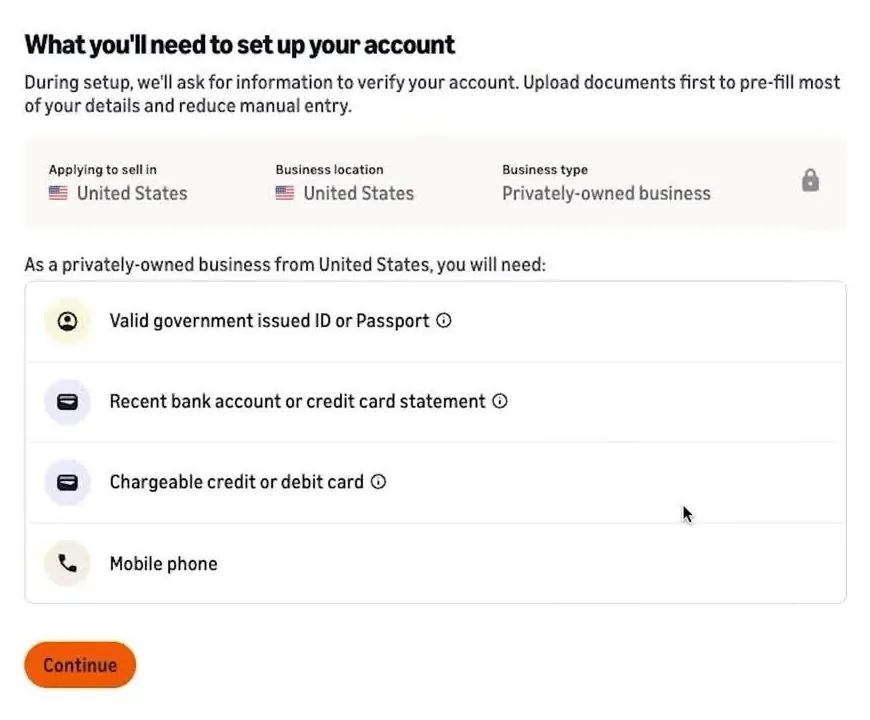
Amazon's checklist of what to have ready, for a privately-owned business in the United States, September 2026, from Travis Marziani's video.
The screen's subtitle says Amazon will ask for information to verify the account, and that uploading documents first fills in most of your details so there's less typing. In the video, the screen after the checklist asks you to upload your business registration document, and Amazon reads the business name and address from it.
If you picked Individual, you won't have a business registration document. Amazon's registration guide lists the business license or registration only for registered businesses.
Then comes the Business Information form. It shows a company registration number, the business name, the registered business address and a phone number for verification. A company registration number is the ID your state gave your company. It is different from an EIN, which is a tax ID number. The IRS issues EINs. Amazon's registration guide says the company registration number differs from your EIN.
- Type the phone number Amazon should send the PIN to. A PIN is a short code that proves you control the phone.
- Under "Receive PIN through," pick SMS (a text message) or Call.
- Click Send verification code, type the code Amazon sends, then click Submit.
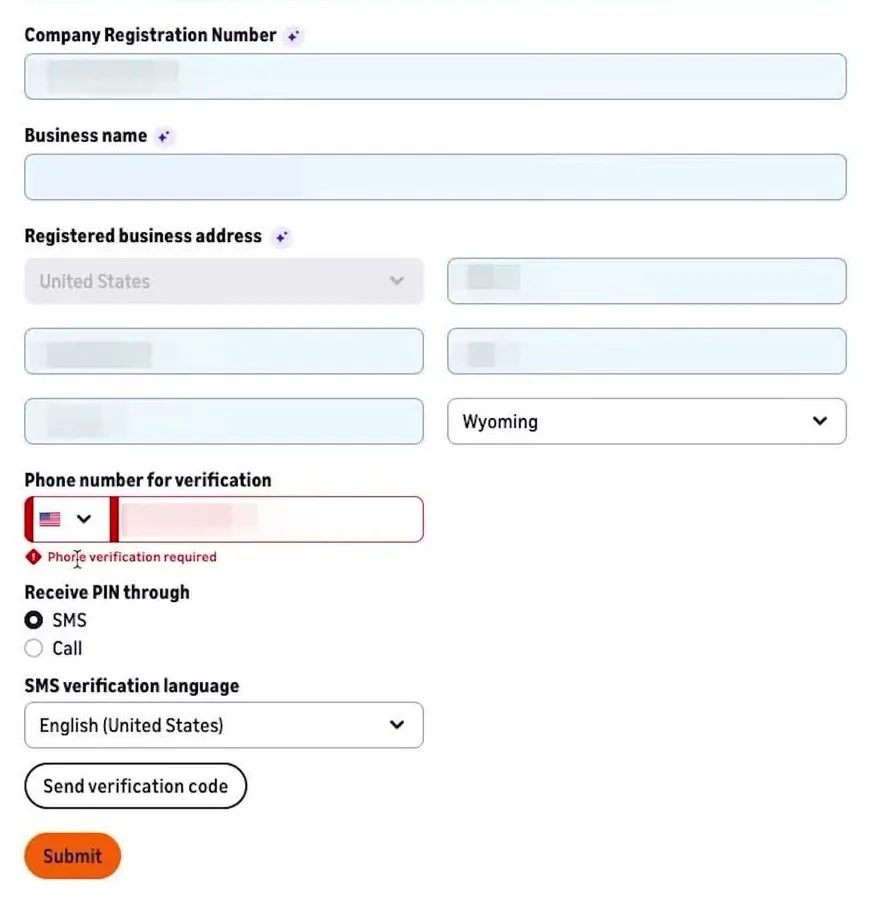
Amazon's Business Information form with the phone PIN choices, September 2026, from Travis Marziani's video. The entries were blurred.
The red line on this screen, "Phone verification required," means the phone number still has to pass the PIN check.
Step 7: What does the primary contact screen ask?
So Amazon wants to know who the person behind the account is. This screen collects the primary contact's name, date of birth, passport or ID details, home address and phone number. In the video, the entries were blurred.
Below those boxes are questions about ownership. "Point of contact is a beneficial owner/director/trustee of the business" has Yes and No choices. A beneficial owner is a person who owns or controls the business. A legal representative section follows, and then "Primary contact person is the only beneficial owner of the business." A checkbox asks you to confirm that you act for yourself or for the registered business. The same checkbox commits you to updating the ownership information if it changes.
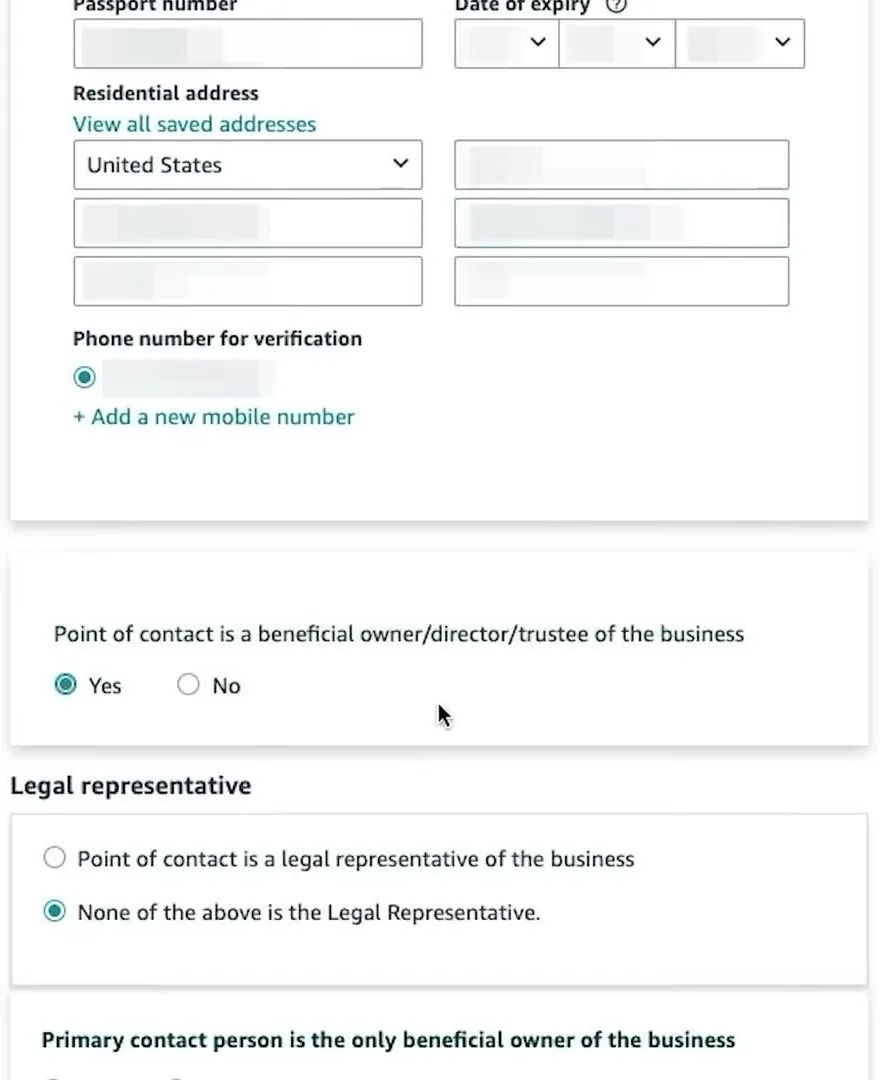
Amazon's primary contact and ownership questions, September 2026, from Travis Marziani's video. The ID and address entries were blurred in the video.
These owner questions appeared because the person in the video picked a registered business. The video doesn't show what an individual sees on this screen.
Amazon asks for a residential address for the primary contact. Amazon's registration guide doesn't say whether that address shows to buyers. Once your account is open, the Seller Profile page in Seller Central shows what buyers can see.
Step 8: Will Amazon charge your card at signup?
So the payment screen answers the question many first-timers ask. It's titled "Payment information," and it has a gray box called "Monthly Subscription Fee."
Here is what that box said in a September 2026 video, for the Professional plan. "You will be charged a Professional selling subscription fee of 39.99 USD for the first month. You will continue to be charged this fee each month if you have active listings. If you do not have active listings, you will not be charged a subscription fee in that month." The box also says the fee gets split across countries if you later sell in other stores, and that you can downgrade at any time.
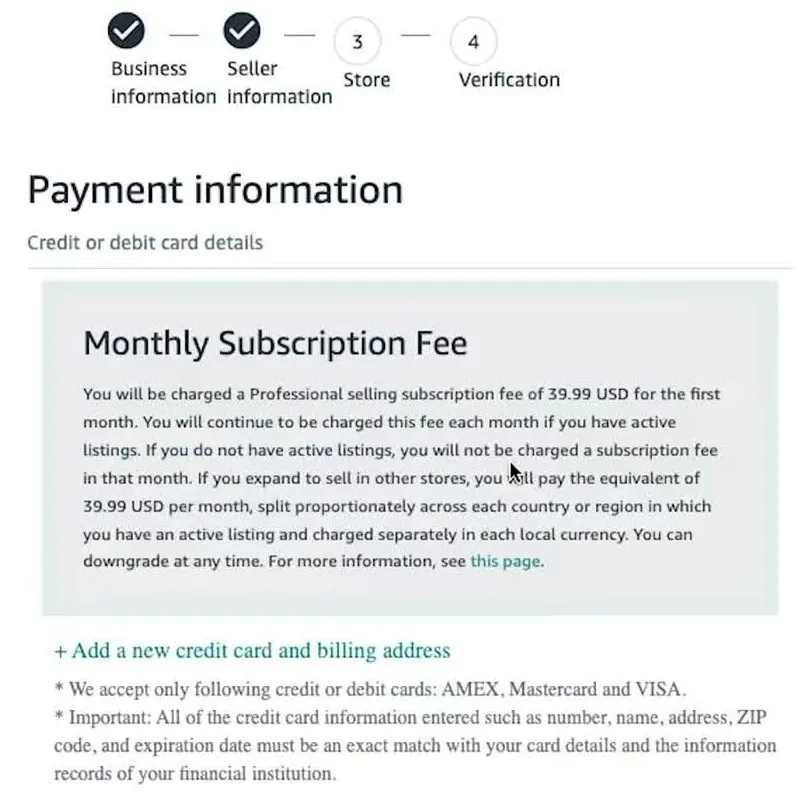
Amazon's Monthly Subscription Fee box on the payment screen, shown September 17, 2026, from Travis Marziani's video. The text uses the Professional plan's $39.99 price.
Keep in mind that this wording comes from the signup screen in that video, not from an Amazon help page. So read the box on your own screen before you add a card. The video's screen is for the Professional plan, and the video doesn't show the same step for the Individual plan.
Now the card itself.
- Click "+ Add a new credit card and billing address."
- On the "Add a credit or debit card" form, type the card number and the expiration date (month and year). Then type the security code (the 3 or 4 digit CVV) and the name on the card, and click the yellow Add and continue button.
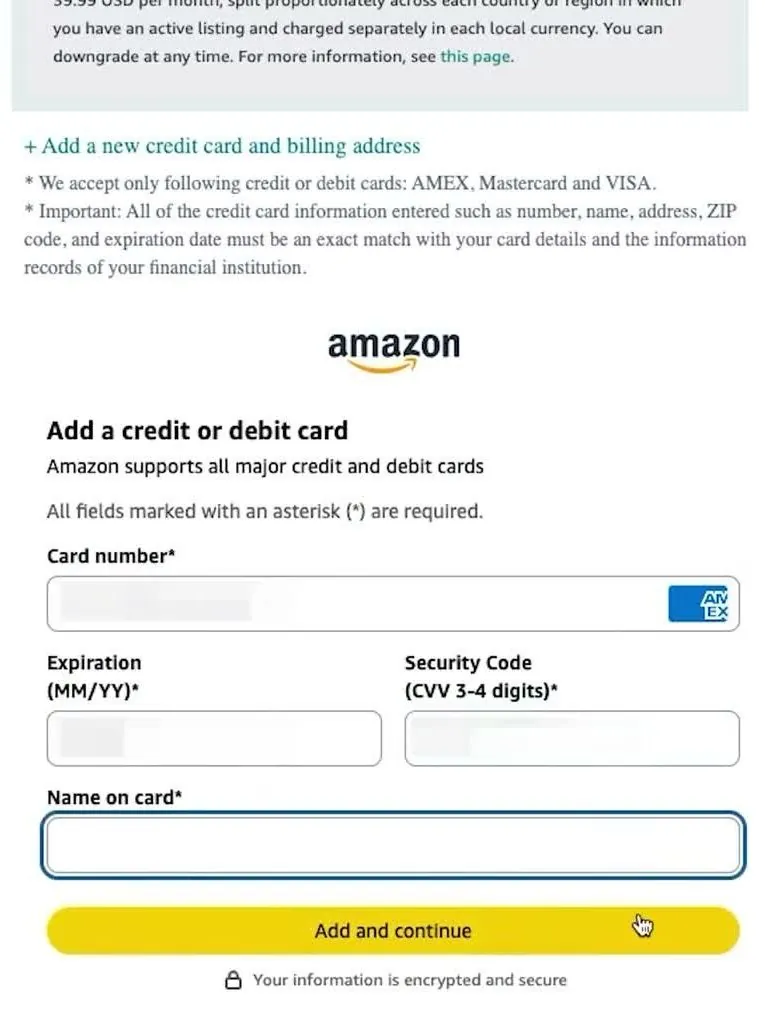
Amazon's card form, September 2026, from Travis Marziani's video. The entries were blurred or removed.
- On the "Add a billing address" form, type your country, full name, phone number and street address. Add an apartment or suite number if you have one, then your city, state and ZIP code. A button near the top says "Autofill your current location." Click Add and continue.
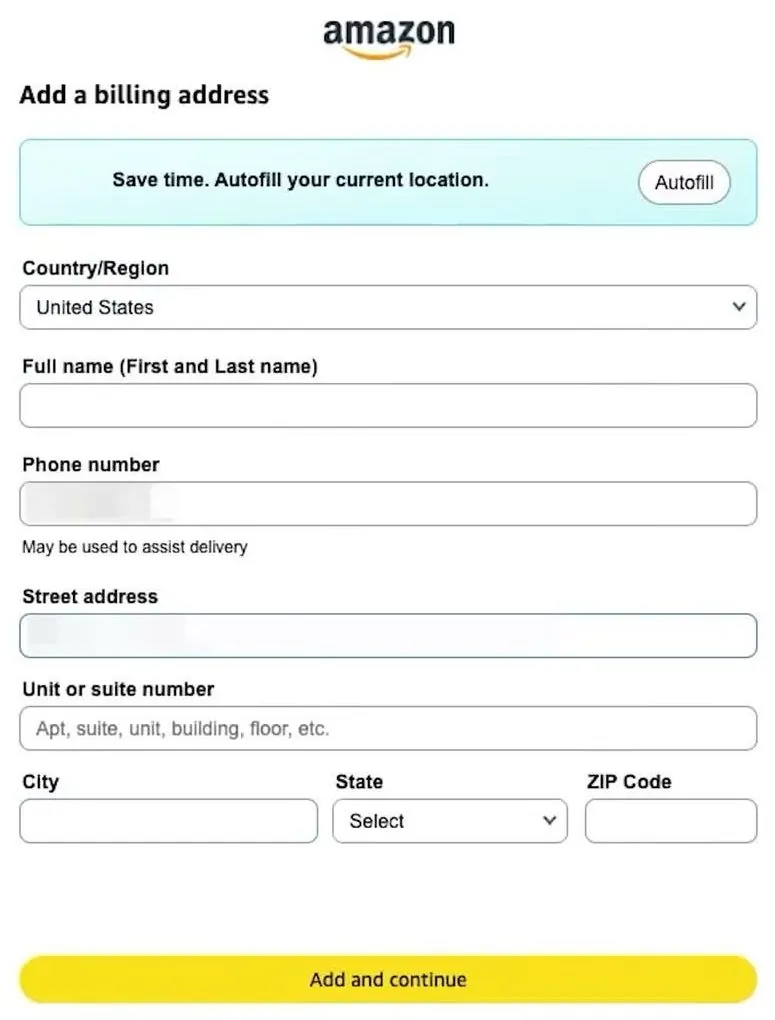
Amazon's billing address form, September 2026, from Travis Marziani's video. The name was removed and the phone and street entries were blurred.
The payment screen has two warnings in small print. It says Amazon accepts only AMEX, Mastercard and VISA cards. And it says the number, name, address, ZIP code and expiration date must exactly match your card details and your bank's records. So type them the way your bank has them.
Step 9: What are the store name and brand questions?
So this screen is titled "Store and Product Information." It starts with a line saying the answers don't impact your ability to register for a selling account.
- Type a store name. A word at the top right of the box shows "Available" when the name is free. Amazon's registration guide says the store name needs to be unique and doesn't have to match your business name.
- Answer "Do you have Universal Product Codes (UPCs) for all your products?" A UPC is the barcode number on a product's packaging.
- Answer the diversity certification question, with Yes and No choices.
- Answer "Do you own a brand? Or do you serve as an agent or representative or manufacturer of a brand for any of the products you want to sell on Amazon?" The choices are Yes, No and Some of them.
- If you answered Yes or Some of them, a trademark question appears. Click Next when you're done.
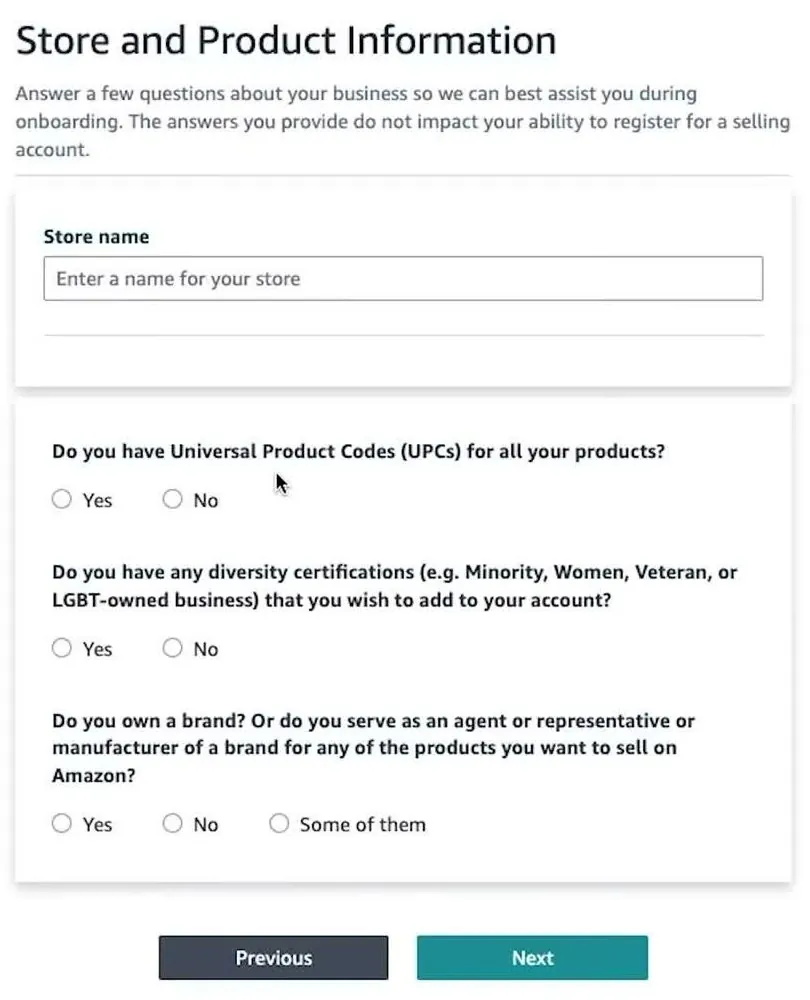
Amazon's Store and Product Information screen before any answers, September 2026, from Travis Marziani's video.
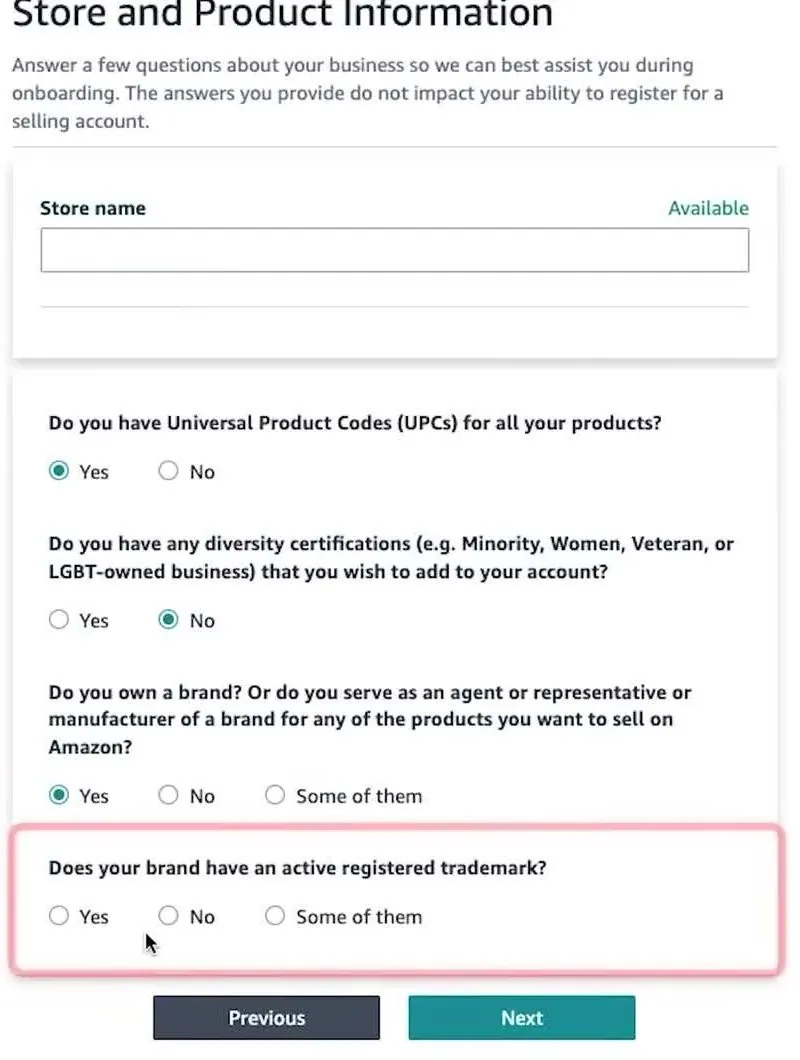
Amazon's trademark question, which appears after the brand question, September 2026, from Travis Marziani's video. The store name was removed.
A trademark is a name or logo registered to protect a brand. On Amazon's pricing page, a footnote on the brand-building tools reads "Requires you to enroll your brand in Amazon Brand Registry." Brand Registry is Amazon's program for brand owners, and its page is at sell.amazon.com/brand-registry. Brand Registry's enrollment requirements aren't covered on this page.
Step 10: Which identity, address and bank documents does Amazon ask for?
So this part is where most of the paperwork shows up. The screen is titled "Identity and Address Verification," and it asks for several uploads. In the September 2026 video's account, the uploads were these.
- The business registration document. The screen asks "Can this business license be used as your registered business address document?" with a Yes and a No choice. If you pick No, you upload a separate address document.
- Proof of the registered business address. A menu offers document types such as an internet bill, a bank account statement or an electricity bill. The screen's note says the document must show the registered name and address, both readable.
- The primary contact's ID. A button reads Upload Passport.
- Proof of the primary contact's home address. The same document type menu appears next to an Upload Document button.
- A business relationship document. The screen says it should include the full registered business name and the full name of the primary user, as given at registration, with an issue date. It should have been issued within the past 180 days.
The video doesn't show the Individual version of this screen. Amazon's registration guide checklist includes a government ID and proof of home address.
Amazon's guide says the documents must be high-quality color scans or photos with all four corners showing and readable text. So a screenshot of a bank statement won't work.
How do you add the bank account?
So Amazon sends your sales money to a bank account you add here. The screen is titled "Add new deposit method."
- A blue box at the top says you must add and verify a bank account to receive disbursements, which are Amazon's payouts to you. It also says only verified accounts can be your default deposit method, and that the bank account holder name must match your business or primary contact information.
- Pick the bank location, United States for a US bank.
- Type the account holder's name as it appears on your bank documents.
- Type the 9-digit routing number, the bank account number, and the account number again to confirm it.
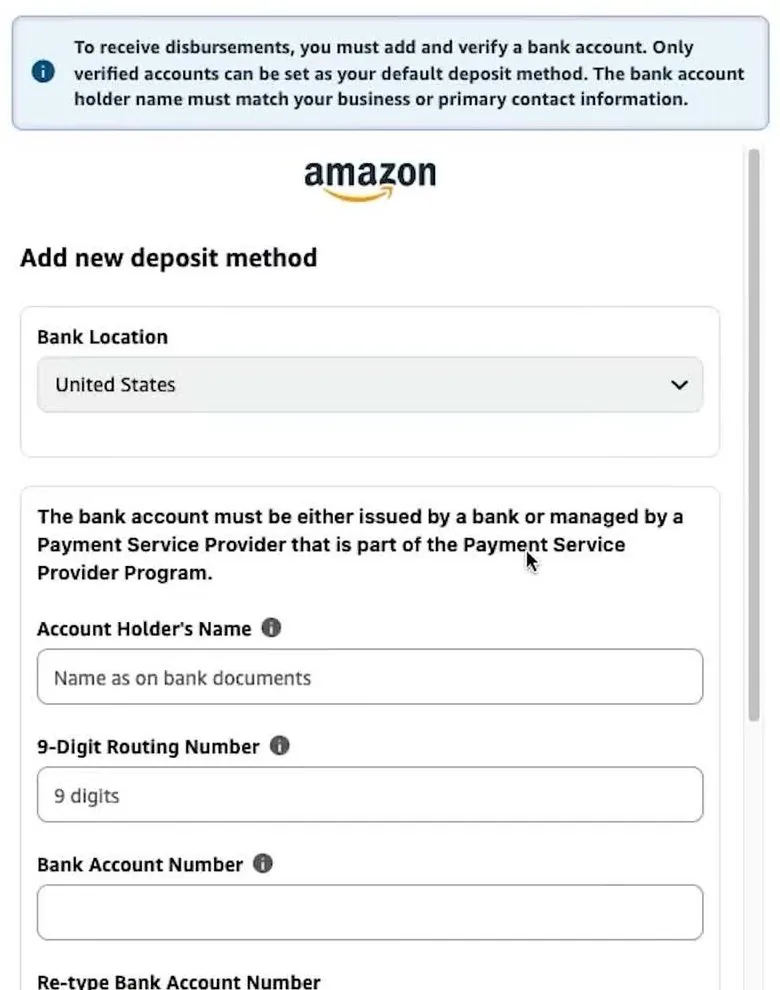
Amazon's deposit method screen for a US bank account, September 2026, from Travis Marziani's video.
A note on the same screen says the account must be issued by a bank, or managed by a Payment Service Provider in Amazon's Payment Service Provider Program. Amazon's registration guide says the bank account must be in your name or your business's name.
Step 11: How does Amazon verify your identity, and how long does it take?
So the last step is Amazon checking that you are who you say you are. Amazon's registration guide gives two ways to do it. One way is to take a photo of your face and your government ID. The other is to join or schedule a video call with an Amazon associate, with your ID and proof of home address ready.
The face photo screen is titled "Verify your identity by taking a photo of your face." It explains that Amazon and its outside providers use facial recognition to verify your identity and prevent fraud. It says Amazon keeps your facial data for up to two years or shorter, and that the outside provider will not store it.
- Read the notice, then tick the box that says you consent to Amazon and its providers collecting and storing your facial data for identity checks. The gray Next button stays gray until you tick the box.
- Click Next. The screens that follow open your device's camera. In the video, the ID screen said "We DO NOT Accept screenshots or copies," and a later screen asked the person to look slightly left and right.
- Or, under the Next button, click "here" to verify by hand instead. The screen says this "could delay your verification for more than 2 days."
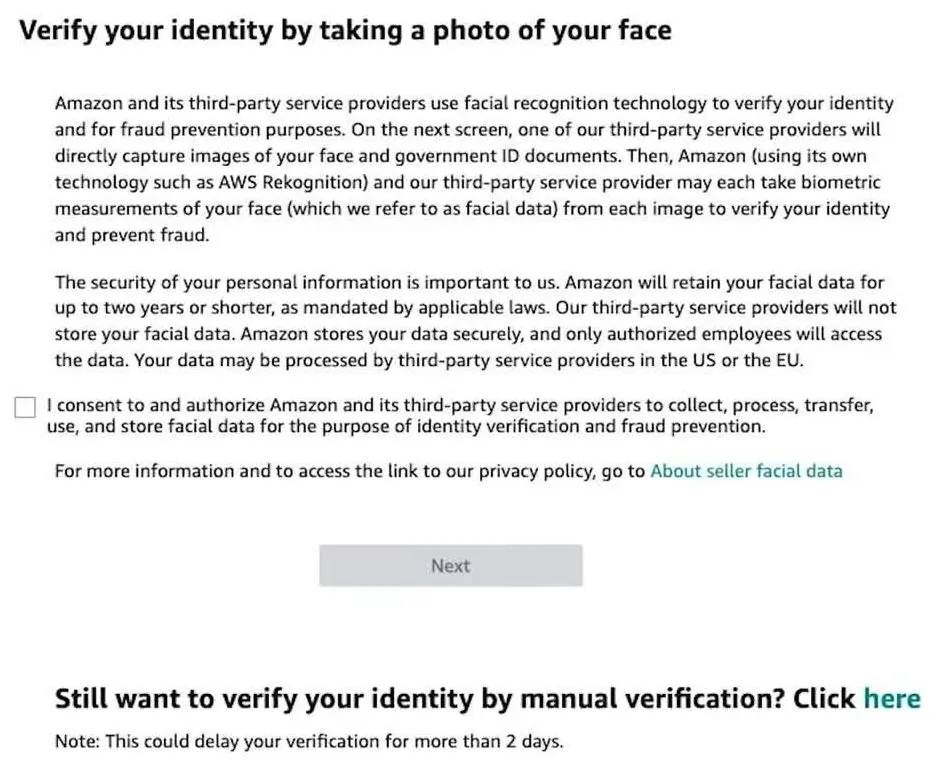
Amazon's face photo screen, with the manual verification option at the bottom, September 2026, from Travis Marziani's video.
After the person in the video submitted, a yellow box appeared. It said "Action Required: We need additional information to verify your account." It told them to check their email for the documents Amazon needed, then submit them through Seller Central.
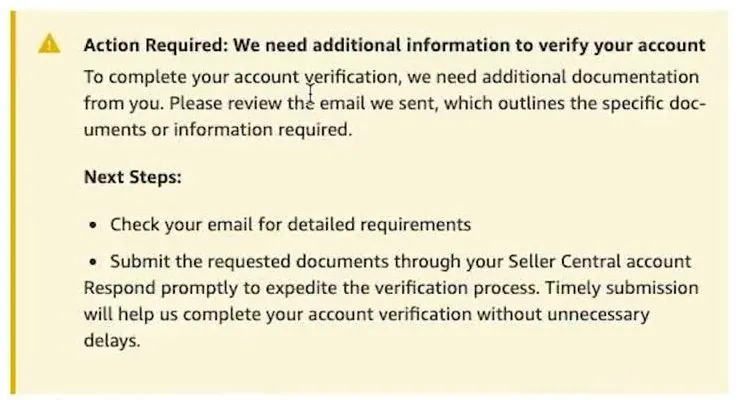
Amazon's Action Required box, shown after the identity step, September 2026, from Travis Marziani's video.
Amazon's pages don't say how often a second request happens. But Amazon's own screen shows it as part of the flow, so check your email after you submit.
How long does Amazon's identity check take?
Here's where Amazon's own estimate and sellers' reports differ. Amazon's registration guide says that in many cases you can finish signup in a few hours, and that verification usually takes three business days or less (checked October 16, 2026). That's Amazon's estimate, not a promise.
Amazon's Seller University video Complete your identity verification as an Amazon seller, is from August 2025. It says verification is instant unless a video call is requested, and that a video call can take up to two business days. That video is older than the screens on this page.
Sellers report longer. A June 2026 seller video says approval took under 48 hours for them, and that some sellers wait several days or weeks. In an Amazon Seller Forums thread about re-verification, one seller said their bank account verified in hours. Their identity check stayed "under review." Those are individual reports, not a count, and they don't tell you what to expect.
The Seller University video lists what to have handy. You need at least two documents. One is a signed government photo ID or passport. The other is a business license or proof of address, such as a bank or credit card statement issued within the last 180 days. Be ready to show the front and back of each document. Use a device with a front camera and microphone, and Chrome, or Safari on iOS.
What do you need to know about taxes when you sell on Amazon?
So Amazon collects your tax information as part of selling, and Amazon's own help page on it is the source for this section. Amazon's US Income Reporting and Tax Identity Collection FAQ was checked on October 16, 2026.
- Everyone completes the Tax Information Interview. Amazon says all selling partners on Amazon.com complete it, regardless of how many transactions they have in a year. That's an Amazon rule.
- Amazon collects a Form W-8 or W-9. These are IRS tax forms. The interview picks the right form, and Amazon's page says not to worry if you're not sure which one applies.
- A US taxpayer's tax ID is usually an EIN or a Social Security number. Amazon's page says that in most cases the tax ID is one of those two. An EIN is a tax ID number for a business, and the IRS issues it. A Social Security number is the personal number you already have.
- Typos can cancel the form. Amazon's page says misspellings or wrong tax ID numbers can result in an invalidated tax form.
- 1099-K reporting. A 1099-K is an IRS form that reports payments you received. The IRS's Form 1099-K page says an online marketplace must send you one when your sales total over $20,000 in more than 200 transactions in a year (checked October 16, 2026). The IRS page says you may get one for less, and that you must report all your selling income either way. Amazon's page says certain states use a different threshold.
Amazon's page doesn't say where in signup the interview appears, and the September 2026 video doesn't show it.
Amazon's page also says Amazon does not provide tax guidance and tells you to contact a tax professional. This is general information. A state tax agency or an accountant can confirm what applies to you in your own state. On the company side, my LLC and EIN guide covers when you'd want an LLC and an EIN.
Step 12: Is the product you want to sell restricted?
So some products need Amazon's approval before you can sell them. Amazon calls those gated or restricted. Amazon's help page Categories and products that require approval was checked on October 16, 2026.
- Amazon's page lists these categories as needing approval. They are Postage stamps, Collectible Coins, Entertainment Collectibles, Fine Art, Jewelry, Made in Italy, Music and DVD, Clothing and Accessories, Services, Sports Collectibles, Streaming Media Players, Video, DVD and Blu-ray, and Watches.
- Restrictions can apply to a single product, a brand, a brand inside a category, a whole category or a sub-category. Some products need several approvals.
To check a product, go to Add Products in Seller Central, search for the product and look at the status Amazon shows.
| Status on Amazon's screen | What Amazon says it means |
|---|---|
| Not Available | You can't list the product. |
| Sell this product | No approval is needed. |
| Apply to sell | Approval is required. Show limitations lists the requirements. |
Amazon's page says to prepare purchase invoices dated within 180 days and clear product photos showing all sides. Depending on the product, Amazon may also want brand authorization letters, safety certifications or commercial liability insurance documents. The page lists the review wait as 2 to 7 business days.
One line from that page is worth knowing. If you get the message "Your account does not qualify," Amazon says you cannot sell that product, the decision cannot be appealed and Selling Partner Support cannot give more details. For categories with enhanced safety listing requirements, Amazon's page asks for commercial liability insurance of at least $1 million for each incident and in total. That's business insurance that pays claims if a product causes harm.
Keep in mind that Amazon's page says restrictions can apply to a single brand or product, even when the rest of the category is open. So check the exact product you plan to sell.
Step 13: How do you list your first product?
So once Amazon approves your account, you list a product from Seller Central. Seller Central is the dashboard you reach at sellercentral.amazon.com. The screens in this step come from an April 2026 video of a seller account that already existed.
- In Seller Central, click Add Products in the top bar. The three-line menu also leads there, under Catalog.
- On "List Your Products," pick how to start. The screen shows five tabs: Keywords, Product IDs, Web URL, Blank form and Bulk template.
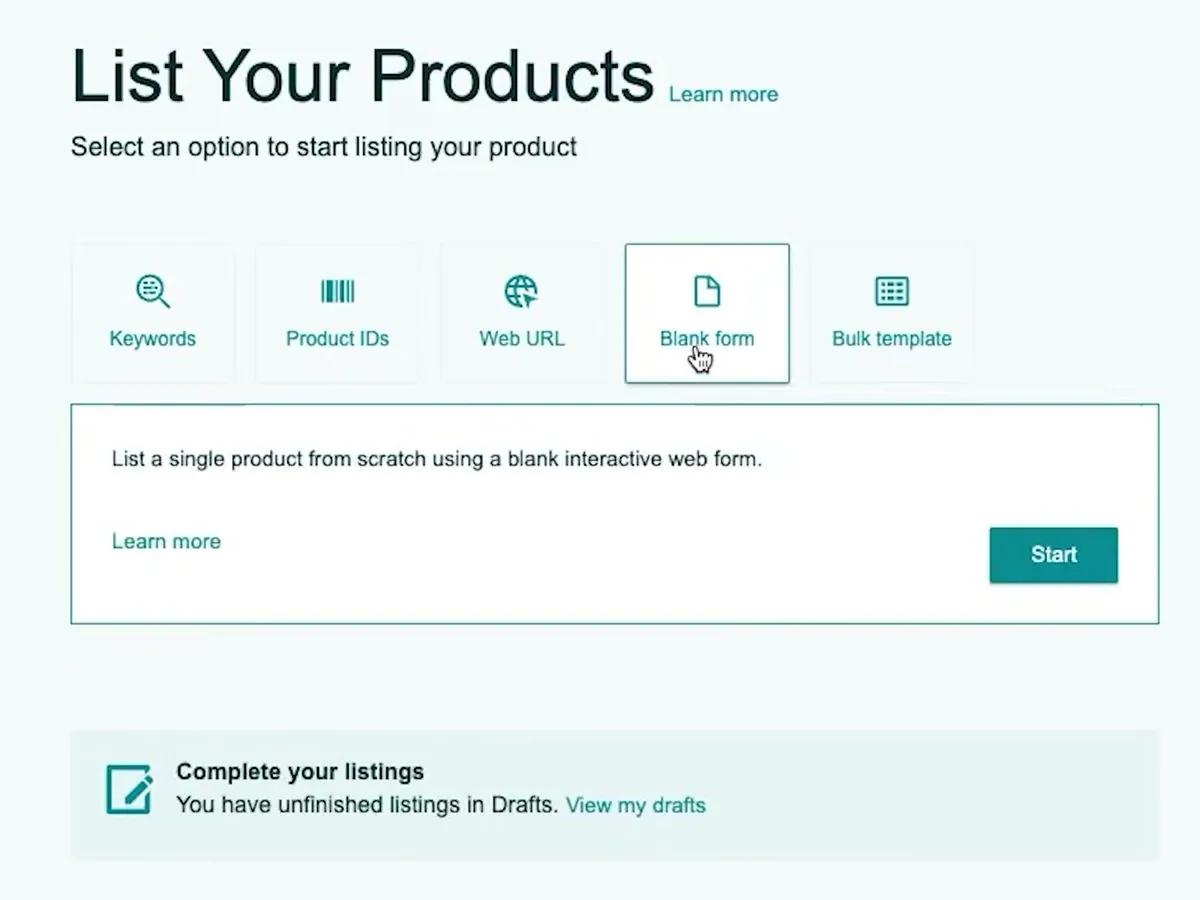
Amazon's List Your Products screen with the Blank form tab open, April 2026, from Travis Marziani's channel video.
So here's what each tab does. The Keywords tab says "Find your product in Amazon's catalog using a few words." The Blank form tab says "List a single product from scratch using a blank interactive web form," with a Start button. A Drafts link at the bottom holds unfinished listings.
Should you match an existing listing or create a new one?
Basically, if Amazon already has a page for your exact product, you search for it and add your offer to that page. Amazon's Fulfilled by Merchant page says to "Match offers to existing product listings in the Amazon store," or create new detail pages for products that aren't in the catalog yet. If the product isn't in Amazon's catalog, Amazon's seller page says to create a new listing. A product that needs approval shows "Apply to sell" at this point, as Step 12 explained.
What does the new listing form ask for?
If you create a new listing, Amazon first asks which kind of product it is. You type a word and Amazon shows a list of matching categories. In the video, a search for one product word returned "14 matching categories found."
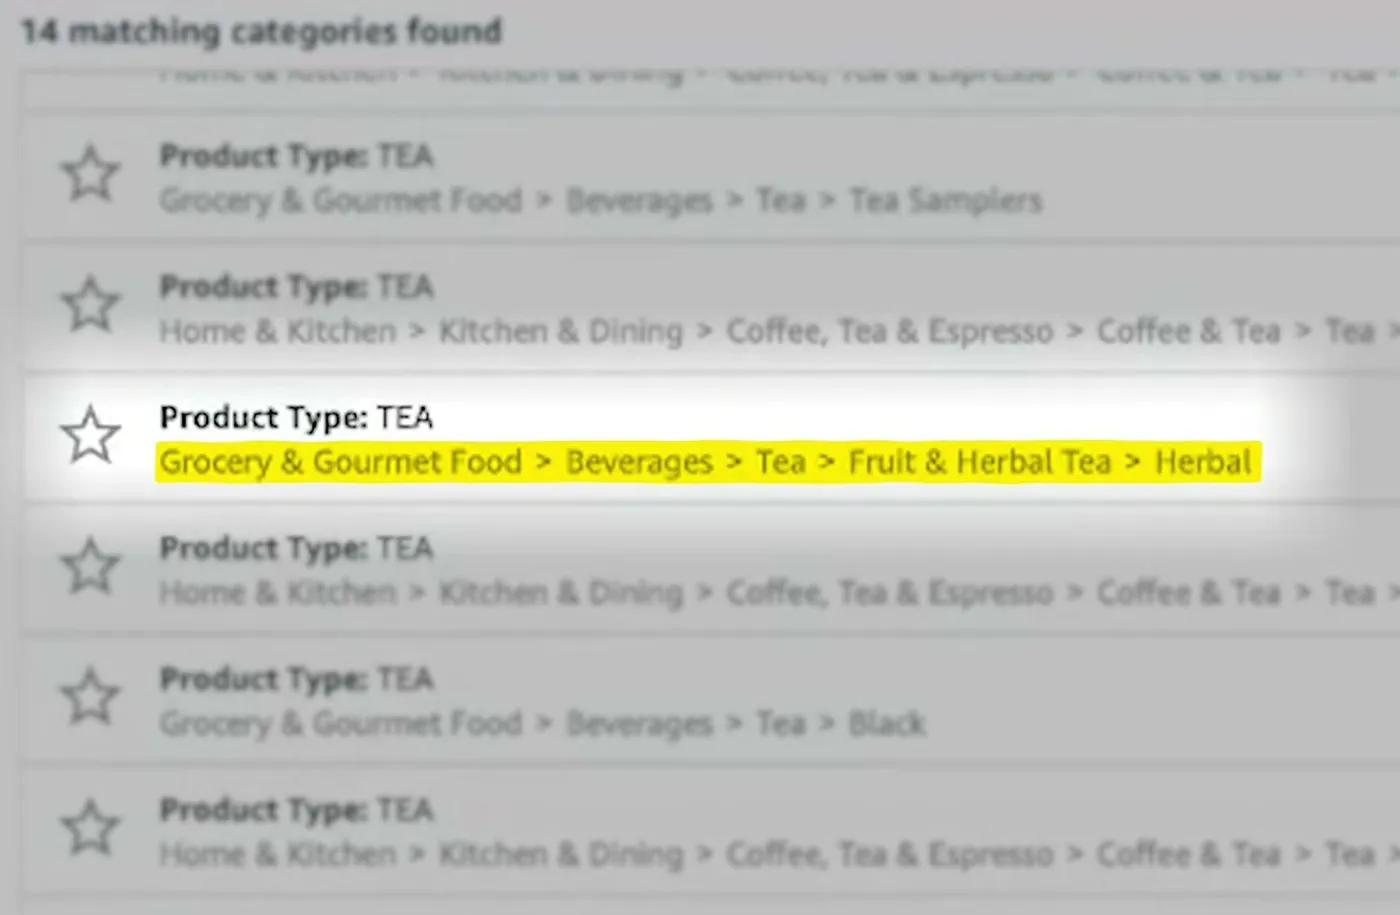
Amazon's list of matching categories for a product search, April 2026, from Travis Marziani's channel video. The yellow highlight was added by the video.
Then the product form opens. A blue banner says you're viewing a new version of the Add a Product tool, with updated product information requirements. The form asks for these items.
- Item Name: the product's title.
- Product Type and Item Type Keyword: the category you just picked.
- Variations: a checkbox for products that come in versions like sizes or colors.
- Brand Name: a box for the brand, plus a checkbox reading "This product does not have a brand name." A link next to it goes to Amazon's brand name policy.
- External Product ID: a box for the barcode number and a menu for its type, such as UPC. A checkbox reads "I don't have a Product ID."
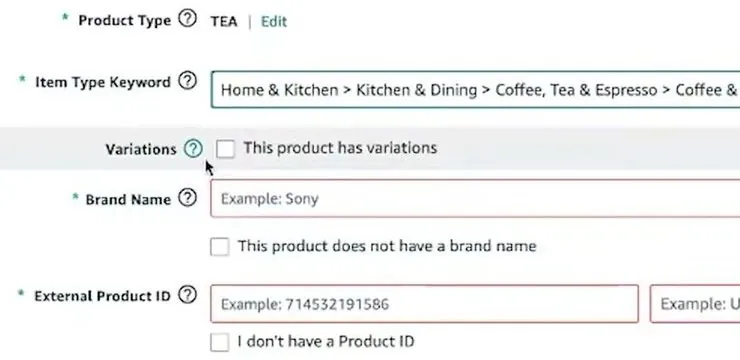
Amazon's Add a Product form, from the Product Type row down, April 2026, from Travis Marziani's channel video. The Item Name row above these was cropped out.
Tabs at the top of the form lead to more pages: Product Identity, Description, Product Details, Offer, and Safety and Compliance. The Description tab asks for a product description, bullet points and images. Amazon's screen says a listing can have a maximum of 9 images.
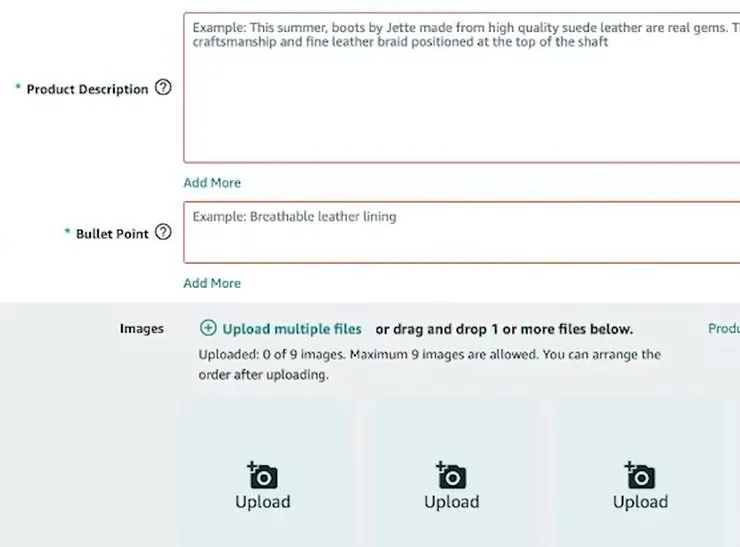
Amazon's Description tab with the description, bullet point and image boxes, April 2026, from Travis Marziani's channel video.
The video says the Offer tab is where you set the price, quantity and condition, and choose who ships the product. That tab isn't in the screens above. When you save the listing, the video says the listing is finished.
Who ships the product: FBA or FBM?
So on the Offer tab you choose between two ways to get orders to customers. Amazon's pages describe both (checked October 16, 2026).
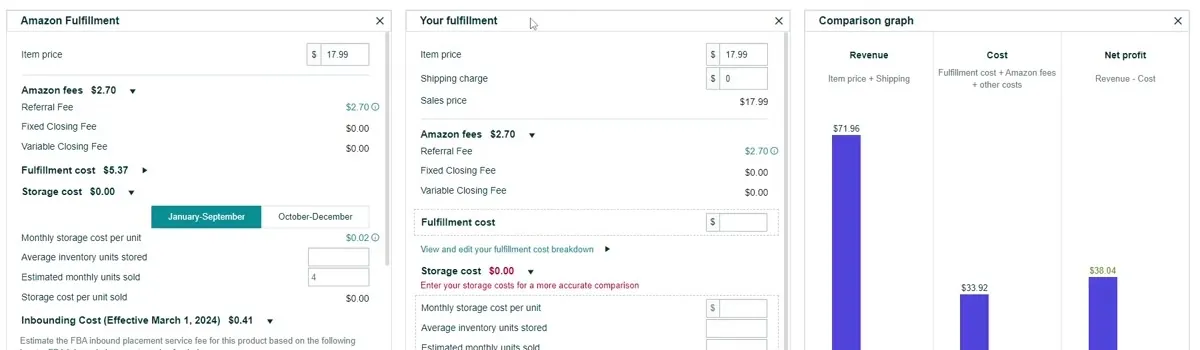
- FBA, or Fulfillment by Amazon, means you send your products into Amazon's fulfillment centers before they sell. Amazon's FBA page says Amazon then picks, packs and ships the orders, and handles customer service and returns. Amazon's FBA vs FBM article says FBA is pay-as-you-go, with storage and fulfillment costs charged per unit and per order.
- FBM, or Fulfilled by Merchant, means you keep your own stock and ship orders to customers. Amazon's FBM page says you set handling and transit times and answer return requests within 24 hours.
Amazon's FBA page says you can use FBA with either the Individual or the Professional plan. Amazon's FBA vs FBM article says many sellers use both methods, product by product. The fees and the trade-offs are in my FBA vs FBM guide and my Amazon seller fees guide. Amazon's own FBA vs FBM article is the source for the comparison.
Can you sell on Amazon for free, or without holding inventory?
So these are two questions people search for a lot when they start out. I'll take them one at a time.
Can you sell on Amazon for free?
Creating the account is free. Amazon's seller page says so, and it also says there are fees associated with selling. Selling costs money in these ways, all checked October 16, 2026.
- The Individual plan is $0.99 for each item sold, plus the referral fee.
- The Professional plan is $39.99 a month, plus the referral fee. The Monthly Subscription Fee box in the September 2026 video, shown in Step 8, said the Professional fee is charged for the first month. After that, the box said, it's charged only in months with active listings. That's what one dated screen showed, not a rule on an Amazon help page.
- FBA adds fulfillment and storage fees. FBM adds postage and packing.
So what's actually free is registering. On the Individual plan, there's no monthly fee, and you pay when something sells. You still pay for the product itself, and for shipping if you use FBM.
Can you sell on Amazon without inventory?
Not in the way most people hope. Amazon's Drop Shipping Policy says drop shipping is not acceptable unless it's clear to the customer that you are the seller of record. Drop shipping means a supplier ships the order straight to your customer. Seller of record means the business named as the seller on the sale.
- You must have an agreement where you are the only seller of record.
- You must remove other sellers' packing slips and invoices before shipping.
- You stay responsible for accepting and processing customer returns.
- Amazon's page says one thing is "strictly prohibited without exception." That's buying from another retailer, including Amazon, and having that retailer ship straight to your customer without your name on the package. Breaking the policy can restrict your ability to sell with your own shipping.
There is one Amazon program built around no stock. Merch on Demand is Amazon's print-on-demand program. Its page says "We handle your printing and shipping," and that there are no upfront costs. It also says Amazon prints your product after each sale and pays you a royalty on every product sold. The page doesn't give royalty figures or an approval time, so I won't quote any. Merch on Demand has its own content rules, so read the page before you sign up.
Can you sell on Amazon from home?
Amazon's registration guide asks for proof of residential address, so registering from home is part of the normal signup. FBM from home means you store, pack and ship from your own space. Local rules and sales tax permits depend on your state, so I don't cover them on this page. My LLC and EIN guide covers the paperwork basics.
What can slow down a first Amazon seller account?
So most delays come from details that don't match. These come from Amazon's own pages and screens.
- Documents Amazon can't read. Amazon's guide asks for color scans or photos with all four corners and readable text. Screenshots and blurry images aren't accepted.
- A bank account in the wrong name. Amazon says the bank account must be in your name or your business's name.
- A card Amazon doesn't accept. The card screen in the September 2026 video says only AMEX, Mastercard and VISA work, while Amazon's registration guide lists more brands.
- Card details that don't match the bank's records. The card screen says the number, name, address, ZIP code and expiration date must be an exact match.
- A product that needs approval. Step 12 shows how to check before you buy stock.
When is Amazon the wrong choice?
- If you want to own the customer relationship and your own brand. In my opinion, a marketplace works against you if you want repeat customers on your own list, because Amazon owns the relationship with the shopper. My Shopify vs Amazon FBA guide compares the two. If you'd like your own store on Shopify, my guide to starting a Shopify store has the same step-by-step.
- If you make handmade things. Etsy is a marketplace built around handmade and vintage items. My guide to starting an Etsy shop and my Etsy vs Amazon Handmade guide compare them.
- If you want to start with no cost at all. Registering is free, but Amazon charges $0.99 an item or $39.99 a month once you sell, checked October 16, 2026.
But otherwise, Amazon can make sense if you want your products in front of shoppers who are already there, and you can follow Amazon's rules. Starting on the Individual plan keeps Amazon's plan charge at zero until something sells.
Videos worth watching before you start
And if you'd like to watch someone click through the screens, here are three videos. You can play each one right here, and YouTube's usual controls work. Under each video is a quick summary, so you can decide if it's worth your time.
A screen recording of a new Amazon seller account, from the plan choice to the identity photo. The channel also promotes its own paid coaching, and this page doesn't link to that. The screens on this page come from this video.
- The signup questions: The video shows the login form, the business type screen and the product and experience questions.
- The documents: The video shows the upload screens for the registration document, the ID and the proof of address.
- The payment screen: The video shows the Monthly Subscription Fee box, the card form and the billing address form.
- The identity step: The video shows the bank account screen, the face photo screen and the Action Required box.
A screen recording of listing a product in an existing seller account, with a presenter named James. The channel also promotes a paid course and a software tool, and this page doesn't link to those.
- Add Products: The video shows the List Your Products screen and its five tabs.
- Matching or creating: The video shows searching for an existing listing and starting a new one.
- The form: The video shows the category list and the Item Name, Brand Name and Product ID rows.
- Description and images: The video shows the description, bullet point and image boxes.
- Shipping choice: The video ends on the Offer tab and the choice between FBA and FBM.
Amazon's own short video on the identity check. It uses slides, not screen recordings, and it is older than the other two videos.
- The documents: The video says to have at least two, a signed government photo ID or passport and a business license or proof of address.
- How to show them: The video says to show the front and back of each document.
- The device: The video says to use a device with a front camera and microphone, in Chrome or Safari on iOS.
- The wait: The video says verification is instant unless a video call is requested, and a video call can take up to two business days.
So ultimately, what should you do first?
So ultimately, gather your photo ID, a bank account in your name, an accepted card and a recent address statement, then start at sell.amazon.com. If you sell 40 items a month or fewer, the Individual plan costs less in plan fees. That's $0.99 an item sold against $39.99 a month for Professional, checked October 16, 2026. Check whether your product needs approval before you buy any stock, and read the Monthly Subscription Fee box on your own screen before you add a card. And if the paperwork feels like a lot, take the screens one at a time. Amazon's signup shows a progress bar, so you can see how far along you are.
Have a question about “How to start selling on Amazon, step by step, if you've never sold online”?
Ask it here. Every question comes to me first. I answer as many as I can, and each answered question goes on this page with my answer so other people starting a store can see it too. I don't ask for your email, so check back on this page for the answer.
More amazon guides
Amazon FBA vs FBM: should a beginner let Amazon ship the orders or ship them yourself?
What each one means, every FBA fee with peak and regular rates, one worked example you can redo, and an honest answer on whether FBA is worth it.
Amazon Individual vs Professional selling plan: which one should a beginner pick?
The prices, the 40 items a month break-even point, what only Professional can do, where Amazon's own pages disagree, and how to switch.
- Amazon: Sell on Amazon (free to create an account, no LLC needed, who the Individual plan is for), checked October 16, 2026.
- Amazon: Selling plans and pricing (Individual and Professional prices, referral fees, new seller offers), checked October 16, 2026.
- Amazon: Seller registration guide (what you need, the signup steps, card brands, document quality, bank account rule, verification timing), checked October 16, 2026.
- Amazon Seller Central help: US Income Reporting and Tax Identity Collection FAQ, checked October 16, 2026.
- Amazon Seller Central help: Categories and products that require approval, checked October 16, 2026.
- Amazon Seller Central help: Drop Shipping Policy, checked October 16, 2026.
- Amazon: Fulfillment by Amazon, Fulfilled by Merchant and the FBA vs FBM article, checked October 16, 2026.
- Amazon: Amazon Brand Registry and Merch on Demand, checked October 16, 2026.
- IRS: Get an Employer Identification Number, checked October 16, 2026.
- IRS: Understanding your Form 1099-K (the $20,000 and 200 transaction threshold, reporting all income), checked October 16, 2026.
- Amazon Seller University: Complete your identity verification as an Amazon seller (August 2025), checked October 16, 2026.
- Amazon Seller Forums: a thread on re-verification timing (2026), checked October 16, 2026. This is one seller's report.
- Seller video on account approval timing and the Individual business type with the Professional plan: Crescent Kao (June 2026), checked October 16, 2026. This is one seller's report.
- Screens from Travis Marziani's September 2026 video and Travis Marziani's April 2026 channel video. The Monthly Subscription Fee wording comes from the September 2026 screen, not from an Amazon help page.
Online Store Buddy is an independent site. We're not affiliated with or endorsed by Shopify, Etsy, Amazon, WooCommerce, Wix or Squarespace. Those names are trademarks of their owners.